Modules in JavaScript – The Ultimate Guide to ES Modules
A JavaScript module is a file that allows you to export its code. This allows other JavaScript files to import and use the exported code as their dependencies.
Specifically, a module is simply a JavaScript file that allows you to share its code with other files within your project or with the world through package managers like Yarn and NPM.
Why Use Modules?
In its early days, people used JavaScript mainly for trivial scripting tasks like providing bits and pieces of interactivity to web pages where needed. In other words, developers predominately used JavaScript to write small scripts—not large ones.
Today, however, JavaScript has grown into a vast scripting tool capable of doing a lot more than just making web pages interactive.
It is now a norm to have large JavaScript code used for diverse functions like server-side website development, game development, and mobile app development.
Since JavaScript can be used for virtually any programming task, a need arose to share scripts between a project's files and the world.
So, the JavaScript community developed the module system to allow developers to share their scripts on demand.
Common Types of Module Systems in JavaScript
Below are some of the popular module systems in JavaScript:
ES modules are sometimes called "JS modules" or "ECMAScript modules".
Amongst the module systems listed above, the ES module system is the official standard for JavaScript.
The remaining three (AMD, CommonJS, and UMD) were created by various developers when JavaScript did not have a standardized module system.
However, since the ES module's appearance in the 2015 ECMAScript standard, the previous module systems have gradually become part of JavaScript's history.
Therefore, this article will focus on showing you how ES modules work.
First, though, it is essential to know how to convert a JavaScript file into a module. So, let's discuss that below.
How to Convert a JavaScript File into a Module
To convert a JavaScript file to an ES module, do the following:
Step 1: Create a project directory
Create a project folder—where this project's HTML and JavaScript files will reside.
Step 2: Create your code files
Create the following files inside your project folder:
index.htmlindex.js
Step 3: Add your JavaScript file to your HTML document
Open your index.html file and replicate the code below:
<!DOCTYPE html>
<html>
  <head>
    <meta charset="UTF-8" />
    <meta name="viewport" content="width=device-width, initial-scale=1.0" />
    <title>ES Module - CodeSweetly</title>
  </head>
  <body>
    <h1>ES Module Tutorial</h1>

    <!-- Add the "index.js" JavaScript file to this HTML document -->
    <script type="module" src="index.js"></script>
  </body>
</html>
In the HTML snippet above, we used the <script>'s type="module" attribute to convert the index.js JavaScript file to an ES module.
So, now that we know how to convert a JavaScript file into a module, let's see how to use one.
How to Use an ES Module
Follow the steps below to learn how to use an ES module.
Use CSS Grid like a pro
Step 1: Create a project directory
Create a project folder—where this project's HTML and module files would reside.
Step 2: Create your code files
Create the following files inside your project folder.
index.htmlmodule-1.jsmodule-2.js
Step 3: Add the modules to your HTML document
Open your index.html file and replicate the code below:
<!DOCTYPE html>
<html>
  <head>
    <meta charset="UTF-8" />
    <meta name="viewport" content="width=device-width, initial-scale=1.0" />
    <title>ES Module - CodeSweetly</title>
  </head>
  <body>
    <h1>ES Module Tutorial</h1>
    <h2>Check the console</h2>

    <script type="module" src="module-1.js"></script>
    <script type="module" src="module-2.js"></script>
  </body>
</html>
Here are the main things we did in the HTML snippet above:
- We added the two JavaScript files to our HTML document.
- We used the
type="module"attribute to convert the regular JavaScript files to ES module files.
Note that JavaScript defers ES modules automatically. So, you do not need to use a defer attribute in your module's <script> element.
Also, the computer will execute a module only once—regardless of the number of <script> tags you use to reference it.
Step 4: View your app
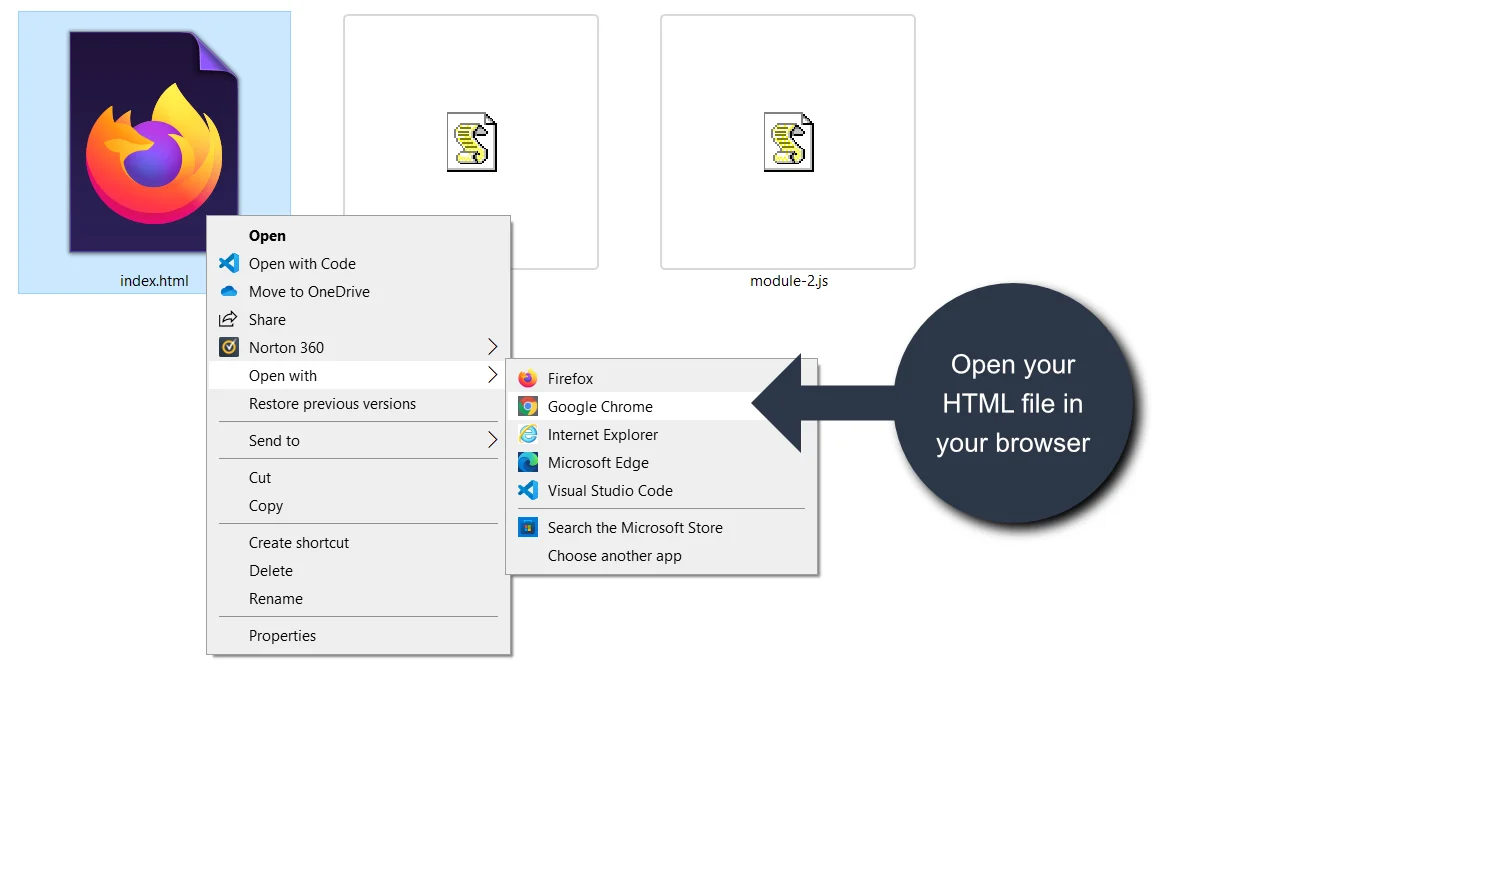
Open your index.html file in any browser to see the current state of your app.
Once opened, if you inspect your browser's console, you will see some error messages.
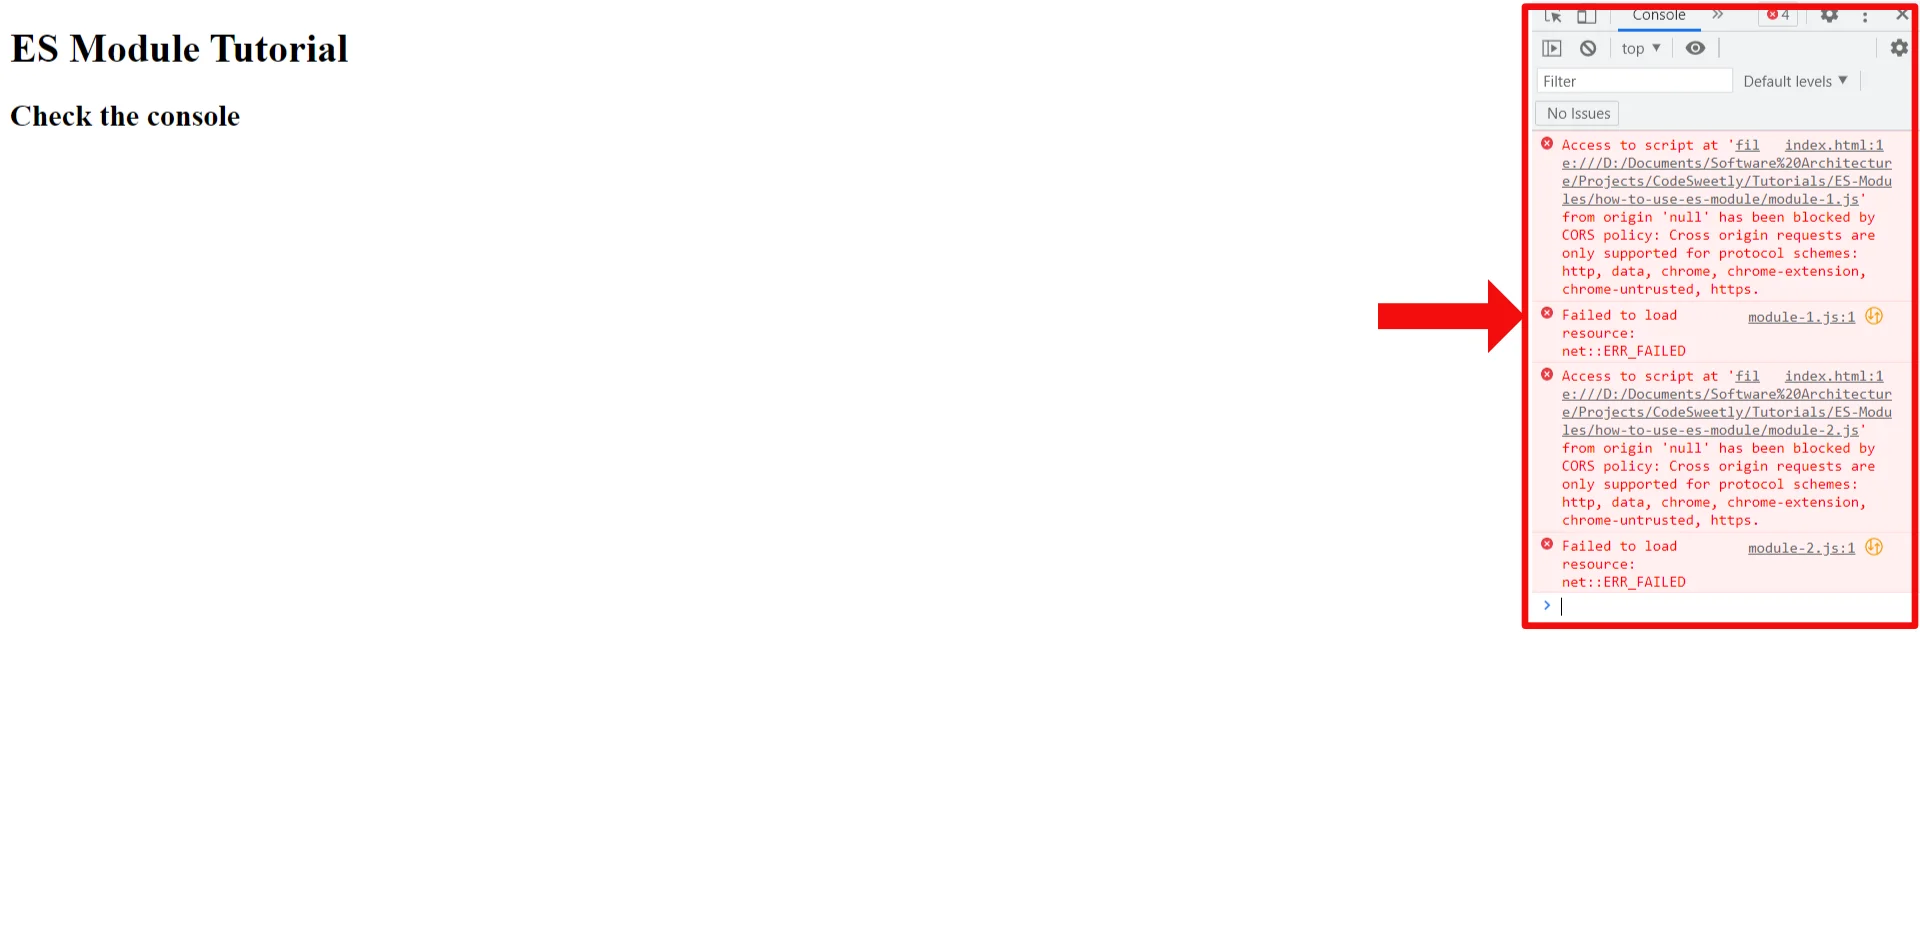
The browser threw a CORS policy error because ES modules only work through http:// and https:// URLs—not locally via a file:// URL.
In other words, since our HTML file contains two ES modules, we need to load the document via an http:// scheme.
The two typical ways to load an HTML document via an http:// scheme are:
- By using a Local Server, or
- Through the use of a Module Bundler
We will discuss Module Bundlers in another article. For now, though, let's see how to use a local server to load the index.html file via an http:// scheme.
How to run an HTML file through a local server
The steps below will show you how to use a VS Code local server extension to run your HTML file.
Suppose your code editor is Atom or Sublime Text. In that case, follow the links below to learn how to install a local server plugin.
1. Add your project folder to VSCode's workspace
Video: Adding a project folder to VSCode's workspace
Build your website with Namecheap
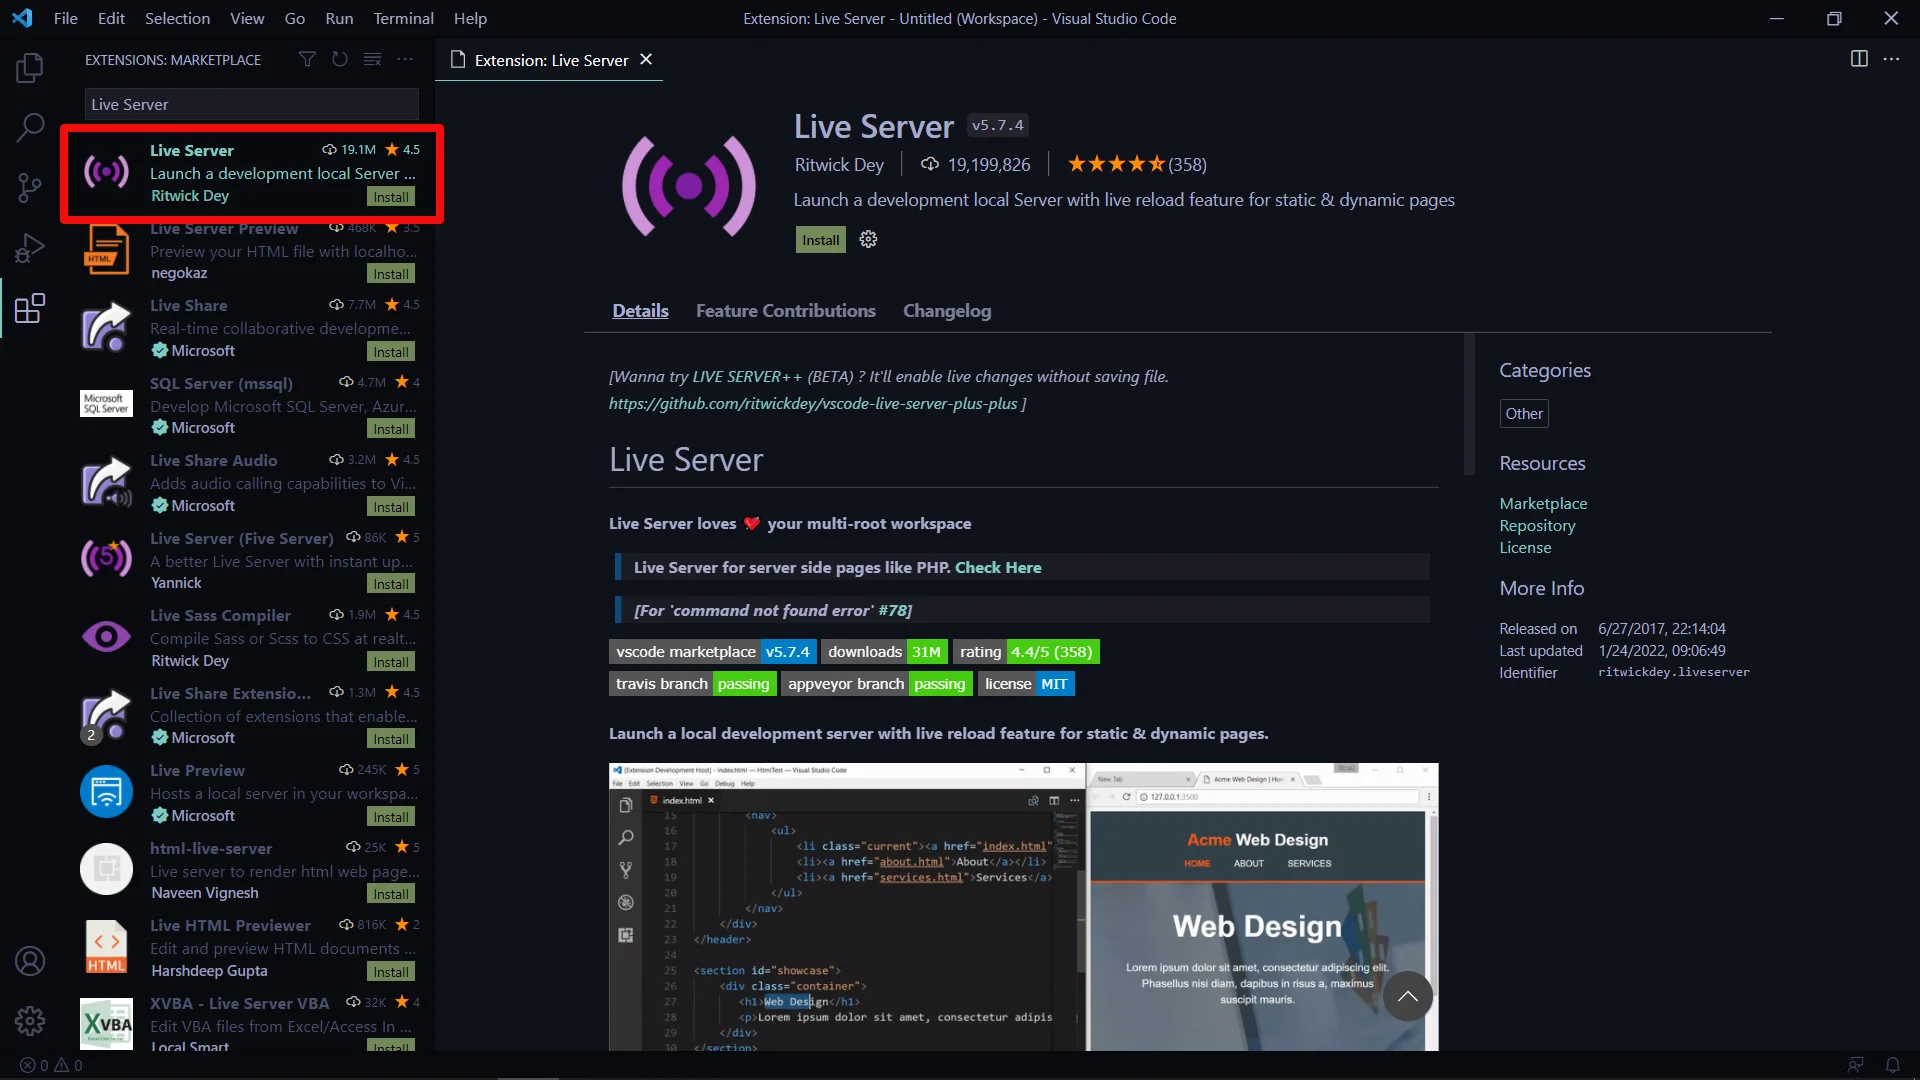
2. Install a local server (Live Server by Ritwick Dey)
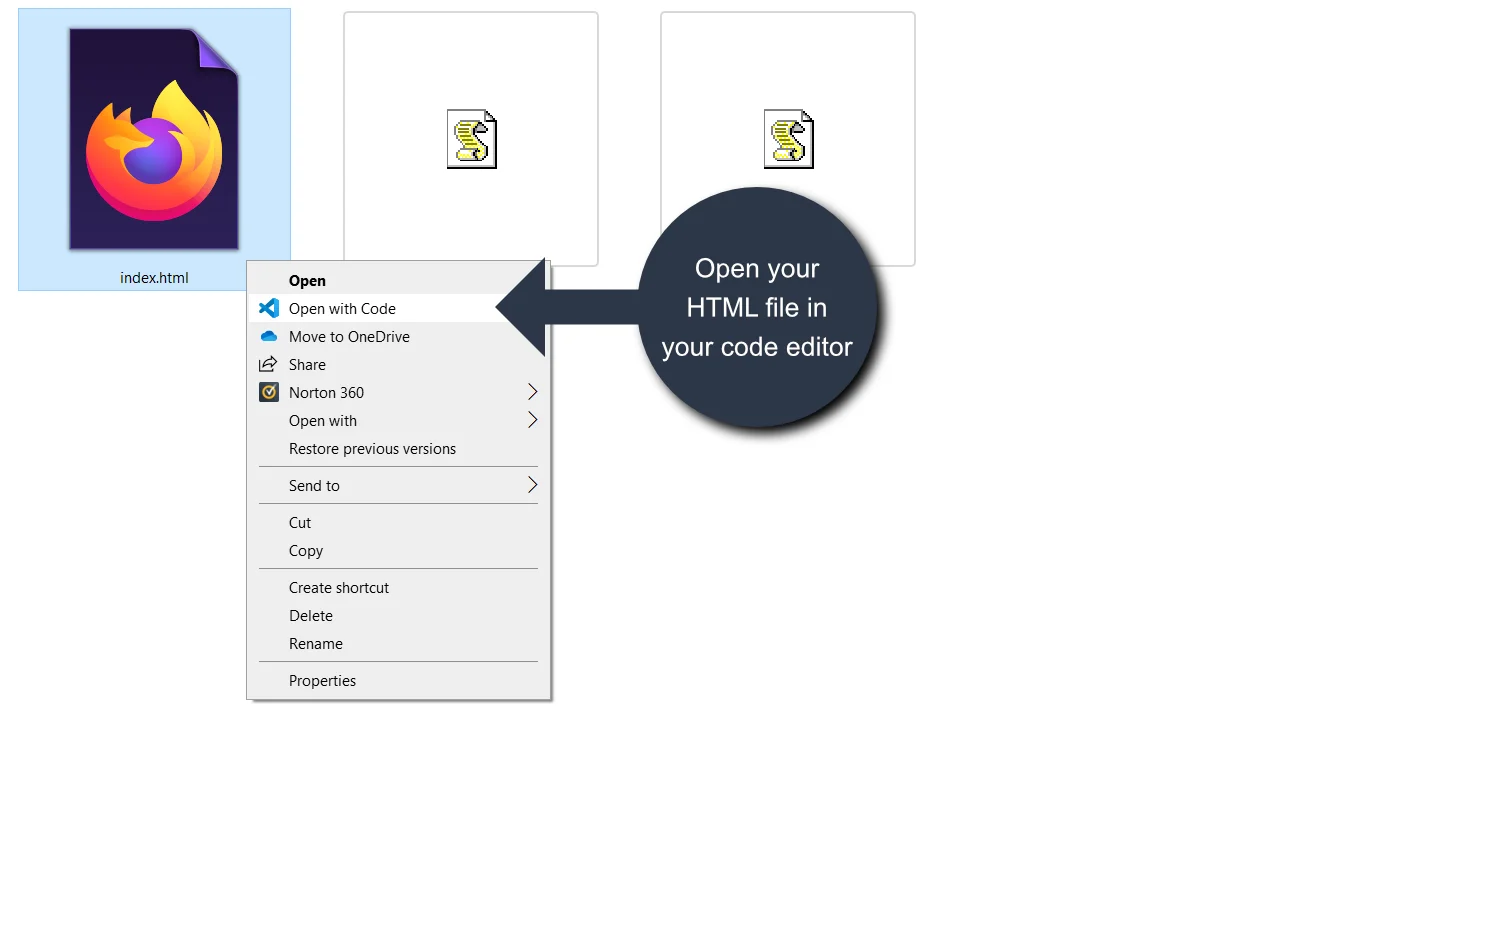
3. Open your HTML file in the code editor
4. Use Live Server to run the HTML file in your default browser
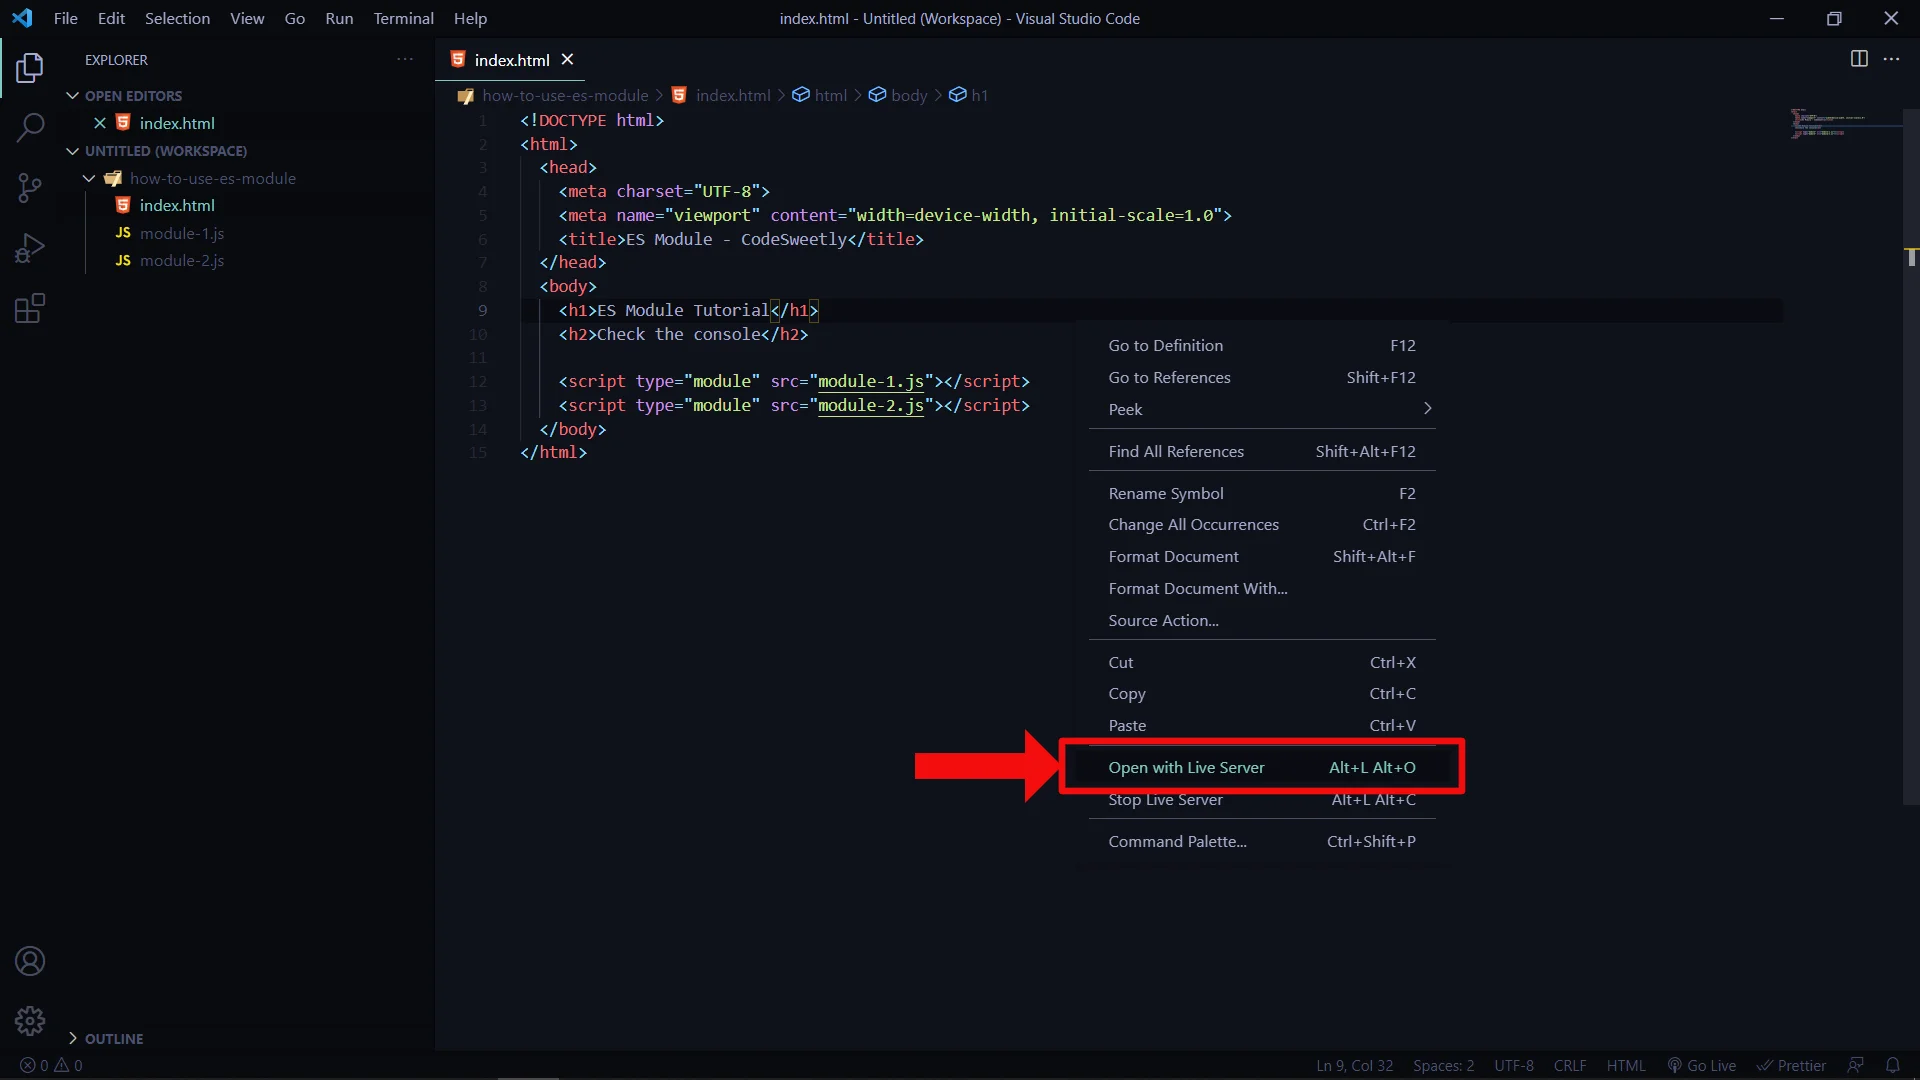
Your app should now load with the http:// scheme—without any CORS error in your browser's console.
- Suppose you did not add your project folder to VSCode's workspace (step 1). In that case, the Live Server might not load your file correctly.
- Live Server will auto-reload your browser whenever you save any changes to your HTML file.
- Suppose you wish to stop the Live Server. In that case, right-click on the HTML editor page and click on "Stop Live Server".
- JavaScript modules operate in strict mode by default. As such, you must abide by JavaScript's strict syntax rules. Otherwise, your program might malfunction.
So, now that you've converted your JavaScript file to an ES module, you can begin to use the export and import keywords to share your modules' code. Let's discuss how below.
How to Export a Module's Code
There are two equivalent ways to export a module's item.
- Place an
exportkeyword before your code - Create an export statement
Let's discuss both ways below.
How to share a module's code by placing an export keyword before the code
One way to export an item is to place an export keyword before the code you wish to share with other modules.
For instance, open your module-1.js file and replicate the code below:
// module-1.js

// Export the "bestClub" variable:
export const bestClub = "Your Club";
You can see how we place the export keyword before our const variable statement in the snippet above.
We prepended the const variable with the export keyword to tell the computer to share the bestClub variable with other modules that request it.
The export keyword highlights the code you wish to share with other modules.
Here's another example:
// Export the "multiply" function:
export function multiply(x, y) {
  return x * y;
}
The statement above instructs the computer to export multiply() to the modules that request it.
Let's now see the second way to export a module's code.
How to share a module's code by creating an export statement
An alternate way to share a module's code is to use the export keyword as a standalone statement. You can do so by prepending a single export keyword to a block ({...}) of comma-separated names of code you wish to share.
Here's an example:
// Create a variable named "bestClub":
const bestClub = "Your Club";

// Create a function named "multiply":
function multiply(x, y) {
  return x * y;
}

// Create an array named "fruits":
const fruits = ["Mango", "Apple", "Orange", "Lemon"];

// Export the three statements above:
export { bestClub, multiply, fruits };
The snippet above used an export statement to indicate that the computer can share bestClub, multiply, and fruits with other modules that request any of them.
Keep in mind that export works only as a top-level item. So, it would not work in a function, for example.
Therefore, the snippet below will throw an error because we used the export keyword inside the function.
function wrong() {
  export let bestClub = "Your Club";
  return bestClub;
}
- The
exportkeyword works only inside modules—not inside regular JavaScript programs. - JavaScript hoists
exportstatements. So, you can define them anywhere in your module. - Exported modules operate in strict mode by default—regardless of whether you specified the
strictstatement.
Let's now see how to import the exported code.
A slick computer trick that makes mistakes disappear
How to Import an Exported Code
To import an exported code, use ES module's import statement.
For instance, open your module-2.js file and replicate the code below:
// module-2.js

import { bestClub } from "./module-1.js";
In the snippet above, we used an import statement to bring in the bestClub variable from the module-1.js file.
So, module-2.js is a top-level module because it contains another script.
On the other hand, module-1.js is a submodule because it is a script used inside another file.
- We use the
importstatement to import items from other modules. - It is mandatory to wrap your named exports in curly braces while importing them.
Keep in mind that an import statement can only get another module's code if exported with the export keyword.
For instance, the import statement below will import the bestClub, multiply, and fruits items if they got marked for exportation in the module-1.js file.
// Import three items from the module-1.js file:
import { bestClub, multiply, fruits } from "./module-1.js";
Suppose you did not use the export keyword to mark the three items as exportable features. In that case, the import statement will throw an Uncaught SyntaxError.
- "Module specifier" and the "import specifier" are other names people call the
"./module-1.js"file path string in the snippet above. - The dot (
.) mark in the"./module-1.js"module specifier means "same directory". In other words, the dot mark tells the computer to find themodule-1.jsfile in the same folder where the current module is. - The current module referred to in the snippet above is the file where the
importstatement got defined.
An alternative to the import specifier's dot (.) syntax is to write out the entire relative path to a module's location.
Here's an example:
// Import three items from the module-1.js file:
import {
  bestClub,
  multiply,
  fruits,
} from "/codesweetly/blog/notes/modular-javascript/es-modules/module-1.js";
You can see how long the import statement above is. We often use the dot syntax because of its short and portable length.
Suppose you choose to use the dot syntax. In that case, keep in mind that some module systems (such as Node.js and module bundlers) permit you to omit the dot mark and the file extension like so:
// Import three items from the module-1.js file:
import { bestClub, multiply, fruits } from "module-1";
However, other module systems, like ES modules, do not permit such omissions.
- A module specifier with no dot mark and file extension is called a "bare" module specifier.
- A module's imported item is a read-only view of the exported feature. So, you can modify the code only inside the module that exported it—not in the module that imported it.
- JavaScript imports a module's code as live binding. So, suppose you update the imported code's value in the exportation module. In that case, your changes will also reflect in the importation module.
Let's now discuss how to use the imported code.
How to Use a Module's Imported Code
Once you've imported your code, you can use it as if it was defined in the module into which you've imported it.
Here's an example:
// module-2.js

import { bestClub } from "./module-1.js";

const myBestClub = bestClub + " " + "is my best club.";

console.log(myBestClub);
- The
importkeyword works only inside modules—not inside regular JavaScript programs. - An imported module's features are not available in the global scope. Therefore, you can access imported items only in the script you have imported them into—not in other places like the JavaScript console.
- JavaScript hoists
importstatements. So, you can define them anywhere in your module. - Imported modules operate in strict mode by default—regardless of whether you specified the
strictstatement.
So, now that we know how to use an ES module, let's discuss how to rename the code you wish to export (or import).
Design in Figma, launch in Webflow
How to Rename Exports and Imports in ES Modules
Suppose you wish to rename the code you are exporting (or importing). In such a case, use the as keyword.
Here's an example:
// module-1.js

// Create a variable named "bestClub":
const bestClub = "Your Club";

// Export the bestClub variable as "favoriteTeam":
export { bestClub as favoriteTeam };
In the snippet above, we told the computer to export the bestClub variable as favoriteTeam.
Therefore, when importing the variable, you will use the name favoriteTeam—not bestClub.
Here's an example:
// module-2.js

import { favoriteTeam } from "./module-1.js";

const myBestClub = favoriteTeam + " " + "is my best club.";

console.log(myBestClub);
We renamed the bestClub variable in the example above while exporting it. However, you can also rename it during its importation.
Here's an example:
// module-1.js

// Create a variable named "bestClub":
const bestClub = "Your Club";

// Export the bestClub variable:
export { bestClub };
// module-2.js

import { bestClub as favoriteTeam } from "./module-1.js";

const myBestClub = favoriteTeam + " " + "is my best club.";

console.log(myBestClub);
The choice of whether to rename your code during exportation or importation is totally up to you.
However, many developers prefer to rename during importation because you don't always have control over a code's source file, especially when importing from a third party's module.
Why Rename a Module's Code?
Renaming can help prevent browsers from throwing errors due to name conflicts. For instance, consider these snippets:
// module-1.js

// Create a variable named "bestClub":
const bestClub = "Your Club";

// Export the bestClub variable:
export { bestClub };
// module-2.js

import { bestClub } from "./module-1.js";

const bestClub = bestClub + " " + "is my best club.";

console.log(bestClub);
When you run the snippets above, the browser will throw an error similar to:
"SyntaxError: Identifier 'bestClub' has already been declared";
The browser threw the error because the imported code's name conflicts with module-2.js' bestClub variable.
However, you can rectify the error by simply renaming the imported code like so:
// module-2.js

import { bestClub as favoriteTeam } from "./module-1.js";

const bestClub = favoriteTeam + " " + "is my best club.";

console.log(bestClub);
Keep in mind that you can also rename multiple exports. Let's see how below.
Create your web presence in no time
How to Rename Multiple Exports in an ES Module
You can rename multiple exports by separating each as statement with a comma.
Here's an example:
// module-1.js

const bestClub = "Your Club";
const fruits = ["Grape", "Apple", "Pineapple", "Lemon"];
function multiply(x, y) {
  return x * y;
}

// Export the three statements above:
export { bestClub as favoriteTeam, fruits as crops, multiply as product };
// module-2.js

import { favoriteTeam, crops, product } from "./module-1.js";

const bestClub = `I bought ${product(2, 11)} ${crops[2]}s at ${favoriteTeam}.`;

console.log(bestClub);
You can also rename multiple imports. Let's see how below.
How to Rename Multiple Imports in an ES Module
You can rename multiple imports by separating each as statement with a comma.
Here's an example:
// module-1.js

const bestClub = "Your Club";
const fruits = ["Grape", "Apple", "Pineapple", "Lemon"];
function multiply(x, y) {
  return x * y;
}

// Export the three statements above:
export { bestClub, fruits, multiply };
// module-2.js

import {
  bestClub as favoriteTeam,
  fruits as crops,
  multiply as product,
} from "./module-1.js";

const bestClub = `I bought ${product(2, 11)} ${crops[2]}s at ${favoriteTeam}.`;

console.log(bestClub);
Suppose you wish to import all exportable content from module-1.js without specifying each import's name. How can you do this? Let's find out.
How to Import All Exportable Items from an ES Module in One Go
Suppose you wish to import all exportable items from a specific module without specifying each import's name. In such a case, use the import * as syntax to bring in the items through a module object.
Here's an example:
// Import all exportable features from the "countries.js" module:
import * as allCountries from "./countries.js";
The statement above instructs the computer to import all exportable content of the ./countries.js module and encase the imports in a module object named allCountries.
After the importation, you can use the imported items just as before. However, you now need to access them through the module object's name.
Here's an example:
// module-1.js

const bestClub = "Your Club";
const fruits = ["Grape", "Apple", "Pineapple", "Lemon"];
function multiply(x, y) {
  return x * y;
}

// Export the three statements above:
export { bestClub, fruits, multiply };
// module-2.js

import * as firstModule from "./module-1.js";

const bestClub = `I bought ${firstModule.multiply(2, 11)} ${
  firstModule.fruits[2]
}s at ${firstModule.bestClub}.`;

console.log(bestClub);
So, what if you prefer to export a module's content anonymously? Let's discuss the technique you can use.
Create your web presence in no time
How to Export Anonymously to an ES Module
So far, we have exported items by explicitly stating the name of the specific code we wish to share—for instance, export { bestClub }.
Such exportation technique is called the named export.
You can also export anonymously by using the default export technique. But what exactly is a default export? Let's find out.
What Exactly Is a Default Export in ES Modules?
Default export is a technique developers use to export code anonymously (namelessly).
You can implement a default export by prepending the keyword default to the code you wish to export. By so doing, the computer will share the code as a default export.
In other words, the code will get exported with the special name, default—instead of its original name (if it had one).
So, during the code's importation, you will have the options to import it with the name default, a custom name of choice, or without any name.
Here's an example:
// module-1.js

const bestClub = "Your Club";

// Export the bestClub variable as a default export:
export default bestClub;
We did not use curly braces in the default export statement above because you can have only one default export in a module.
Alternatively, you can also rewrite the code above like so:
// module-1.js

// Export the string value as a default export:
export default "Your Club";
Keep in mind that you can use the default export technique to share a function, variable, string, class, or object literal.
However, you cannot prepend the export default keyword to a var, let, or const keyword.
In other words, the snippet below will throw a SyntaxError.
export default const bestClub = "Your Club";
Let's now discuss how to import a default export.
How to Import a Default Export into an ES Module
There are two equivalent ways to import a default export:
- Use the
default assyntax - Specify the imported code's name only
Let's discuss the two importation techniques.
How to use the default as syntax to import a default export
One way to import a default export is to use the default as syntax like so:
import { default as newName } from "./module-relative-path.js";
Here's an example:
// module-1.js

// Export the string value as a default export:
export default "Your Club";
// module-2.js

import { default as favoriteTeam } from "./module-1.js";

const bestClub = favoriteTeam + " " + "is my best club.";

console.log(bestClub);
Notice that we didn't need to specify the name of the code we imported from the module-1.js file. Instead, we used the default keyword to import the code anonymously.
Afterward, we renamed the imported code as favoriteTeam.
Let's now see the second way to import a default export.
How to import a default export by specifying the imported code's name only
An alternate way to import a default export is to ignore the curly braces ({...}), the default keyword, and the as keyword.
Instead, simply specify the name you wish to use to reference the imported code like so:
import newName from "./module-relative-path.js";
Here's an example:
// module-1.js

// Export the string value as a default export:
export default "Your Club";
// module-2.js

import favoriteTeam from "./module-1.js";

const bestClub = favoriteTeam + " " + "is my best club.";

console.log(bestClub);
You can see that the shortened importation technique above is neater than the previous option.
- The
export defaultstatement makes it possible for a JavaScript module to interpolate (work reliable) with existing CommonJS and AMD module systems. - See the "Default exports" section of ES6 In Depth: Modules to learn more about interpolation.
Before we wrap up our discussion on ES modules, you should be aware that you can use an aggregator file to collate your project's import statements.
But what exactly is an aggregator file, I hear you ask? Let's find out below.
Design in Figma, launch in Webflow
What Exactly Is an Aggregator File?
An aggregator file is a script used solely to import and re-export the items you've exported from other modules.
In other words, instead of congesting your top-level module with multiple import statements from various files, you can create a single parent script (the aggregator file).
The parent script's sole purpose will be to import and re-export items from other modules.
Then, in your top-level module, you can simply import any required code from the aggregator file alone—not from numerous other scripts.
By so doing, you will make your top-level module neater.
So, what exactly do these all mean? Let's see with a mini-project.
Project: How to Use an Aggregator File
Follow the steps below to learn how to use an aggregator file.
Step 1: Create a project directory
Create a project folder—where this project's HTML and module files would reside.
Step 2: Create your code files
Create the following files inside your project folder.
index.htmlindex.jspreferences.jscalculation.jsbio.js
Step 3: Add the modules to your HTML document
Open your index.html file and replicate the code below:
<!DOCTYPE html>
<html>
  <head>
    <meta charset="UTF-8" />
    <meta name="viewport" content="width=device-width, initial-scale=1.0" />
    <title>ES Module - CodeSweetly</title>
  </head>
  <body>
    <h1>How to use an aggregator file - ES Module Tutorial</h1>
    <h2>Check the console</h2>

    <script type="module" src="index.js"></script>
    <script type="module" src="preferences.js"></script>
    <script type="module" src="calculation.js"></script>
    <script type="module" src="bio.js"></script>
  </body>
</html>
Here are the main things we did in the HTML snippet above:
- We added the four JavaScript files to our HTML document.
- We used the
type="module"attribute to convert the regular JavaScript files to ES module files.
Step 4: Export items from your preference module
Open your preferences.js module and export some items from it like so:
const bestFruits = ["Grape", "Apple", "Pineapple", "Lemon"];
const bestColor = "White";
const bestNumber = 111;
const bestClub = "Your Club";
const bestTime = "Now";

export { bestClub, bestFruits };
Step 5: Export items from your calculation module
Open your calculation.js module and export some items from it like so:
function add(x, y) {
  return x + y;
}

function subtract(x, y) {
  return x - y;
}

export function multiply(x, y) {
  return x * y;
}

function divide(x, y) {
  return x / y;
}
Step 6: Export items from your bio module
Open your bio.js module and export some items from it like so:
const aboutMe = {
  firstName: "Oluwatobi",
  lastName: "Sofela",
  companyName: "CodeSweetly",
  profession: "Web Developer",
  gender: "Male",
};

export default aboutMe;
Want tech support right now?
Step 7: Import the exported features
To import the exported items into your top-level module, you have two options:
- Import directly from the exporting modules to your top-level script.
- Import from an aggregator file to your top-level module.
Let's see the difference between the two options.
Import directly from the exporting modules to your top-level script
One way to import your code is to import it directly from the exporting scripts to your top-level module.
For instance, open your index.js file and import the exported content of the preferences.js, calculation.js, and bio.js modules like so:
// index.js

import { bestFruits } from "./preferences.js";
import { multiply } from "./calculation.js";
import aboutMe from "./bio.js";

const news = `All ${aboutMe.companyName}'s staff gave Tom ${multiply(7, 129)} ${
  bestFruits[2]
}s.`;

console.log(news);
You can see that we imported items directly from three exporting scripts into the index.js module.
The above importation technique works OK. However, a cleaner alternative is to use an aggregator file. Let's see how.
Import from an aggregator file to your top-level module
An alternate way to bring in your code is to import it from an aggregator file to your top-level module.
Follow the steps below to see how you can create and use an aggregator file.
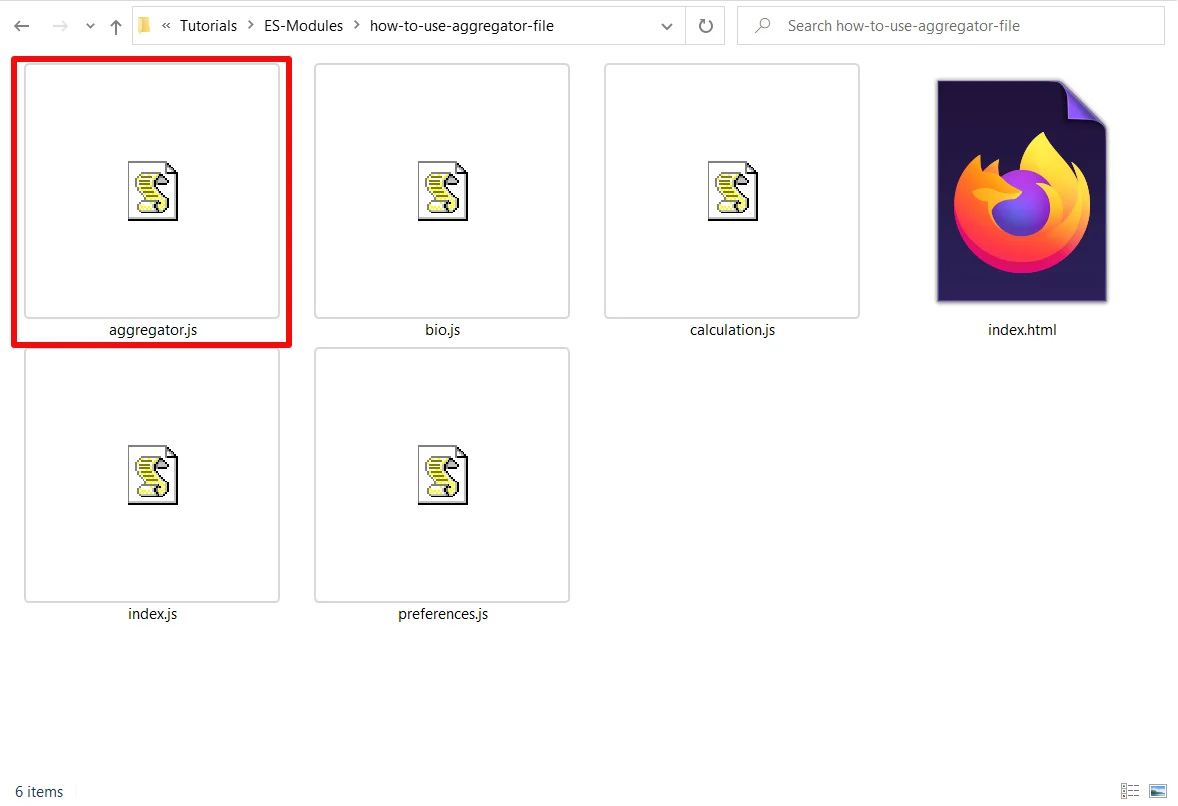
1. Create the aggregator file
You can name the file aggregator.js or any other name you prefer.
2. Add the aggregator script to your HTML file
<!DOCTYPE html>
<html>
  <head>
    <meta charset="UTF-8" />
    <meta name="viewport" content="width=device-width, initial-scale=1.0" />
    <title>ES Module - CodeSweetly</title>
  </head>
  <body>
    <h1>How to use an aggregator file - ES Module Tutorial</h1>
    <h2>Check the console</h2>

    <script type="module" src="index.js"></script>
    <script type="module" src="preferences.js"></script>
    <script type="module" src="calculation.js"></script>
    <script type="module" src="bio.js"></script>
    <script type="module" src="aggregator.js"></script>
  </body>
</html>
Note the following:
index.jsis the top-level module because it is the file where we imported and usedpreferences.js,calculation.js, andbio.js.preferences.js,calculation.js, andbio.jsare the submodules because they are the files we imported into the top-level module.aggregator.jsis the parent module because it is the script for aggregating and re-exporting the three submodules.
Technically, you can indicate just the top-level module in your project's HTML file like so:
<!DOCTYPE html>
<html>
  <head>
    <meta charset="UTF-8" />
    <meta name="viewport" content="width=device-width, initial-scale=1.0" />
    <title>ES Module - CodeSweetly</title>
  </head>
  <body>
    <h1>How to use an aggregator file - ES Module Tutorial</h1>
    <h2>Check the console</h2>

    <script type="module" src="index.js"></script>
  </body>
</html>
By so doing, you avoid cluttering your HTML page with the submodules and parent module.
Let's now see how to use the aggregator module.
Want tech support right now?
3. Use the aggregator module to aggregate the submodules
Here's how to use the aggregator module to import and re-export all your project's exported items:
// aggregator.js

import { bestFruits } from "./preferences.js";
import { multiply } from "./calculation.js";
import aboutMe from "./bio.js";

export { bestFruits, multiply, aboutMe };
You can see that we used the aggregator file only to import and re-export our project's exported features.
The shorthand way to write the import/export statements above is like so:
// aggregator.js

export { bestFruits } from "./preferences.js";
export { multiply } from "./calculation.js";
export { default as aboutMe } from "./bio.js";
Keep in mind that the following syntax is invalid
export aboutMe from "./bio.js";
In other words, whenever you use the export...from syntax to re-export a default export, ensure to rename the re-exportation like so:
export { default as aboutMe } from "./bio.js";
Let's now see how to import re-exported features from an aggregator file.
4. Import your exports from the aggregator file
Once you've aggregated all your submodules into the aggregator module, go to your top-level script (index.js in this case) and import the exported items.
Here's an example:
// index.js

import { bestFruits, multiply, aboutMe } from "./aggregator.js";

const news = `All ${aboutMe.companyName}'s staff gave Tom ${multiply(7, 129)} ${
  bestFruits[2]
}s.`;

console.log(news);
You see, like magic, we've cleaned up our code by replacing three import statements with a single line!
Using an aggregator file to collate your project's exports helps separate concerns and make your top-level module neater.
Up till now, we've used the static import syntax to instruct the computer to evaluate our imported modules' code at load time.
But suppose you prefer to load your modules conditionally or on-demand. In that case, you can use the dynamic import() syntax. Let's see exactly how it works below.
How to Use the import() Syntax to Load a Module Dynamically
To load your module conditionally or on-demand, use the import() syntax like so:
import("./module/relative-path.js").then(function (module) {});
The import() syntax does two main things:
- It loads its module specifier argument (
"./module/relative-path.js"in this case). - It returns a promise object that resolves to a module object containing the import specifier's exports.
So, since the import() syntax returns a promise, you can also use the await keyword with it.
Here's an example:
const module = await import("./module/relative-path.js");
To see precisely how import() works in practice, let's update our previous project by following the steps below.
Get creative with your projects
1. Update your HTML file
Open your index.html file and do the following:
- Update your
<h1>'s content to"The Latest News". - Substitute the
<h2>element with an empty<p>element. - Create a
<button>element.
In other words, your index.html file should look like this:
<!DOCTYPE html>
<html>
  <head>
    <meta charset="UTF-8" />
    <meta name="viewport" content="width=device-width, initial-scale=1.0" />
    <title>ES Module - CodeSweetly</title>
  </head>
  <body>
    <h1>The Latest News</h1>
    <p id="news-paragraph"></p>
    <button id="news-button">Get the News</button>

    <script type="module" src="index.js"></script>
  </body>
</html>
2. Update your index.js module
Open your index.js file and replicate the code below:
// index.js

const paragraphElement = document.getElementById("news-paragraph");
const buttonElement = document.getElementById("news-button");

async function displayNews() {
  let news = null;
  const aggregatorModule = await import("./aggregator.js");

  news = `All ${
    aggregatorModule.aboutMe.companyName
  }'s staff gave Tom ${aggregatorModule.multiply(7, 129)} ${
    aggregatorModule.bestFruits[2]
  }s.`;

  paragraphElement.innerText = news;
}

buttonElement.addEventListener("click", displayNews);
You can see how we used the import() method to load the aggregator module on demand (when a user clicks the button)—rather than upfront.
Although dynamic importation can improve your program's initial load-time performance, it's best to use it only when needed.
The import() method does not require its argument to have a <script> of type="module". Therefore, you can use it in a regular JavaScript file.
Now, suppose you wish to get metadata about your current module. In that case, you can use the import.meta syntax.
What Exactly Is import.meta in ES Modules?
The import.meta code is an object containing information about your current module.
Here's an example:
<!DOCTYPE html>
<html>
  <head>
    <meta charset="UTF-8" />
    <meta name="viewport" content="width=device-width, initial-scale=1.0" />
    <title>ES Module - CodeSweetly</title>
  </head>
  <body>
    <h1>About import.meta</h1>
    <h2>Check the console ⬇⬇⬇</h2>

    <script type="module">
      console.log(import.meta);
      console.log(import.meta.url);
    </script>
  </body>
</html>
The import.meta code in the snippet above will return some information about the module in which it got used.
Overview
We've learned that a JavaScript module is simply a file with an addon capability to share its code with other modules within a project—or with the world through package managers like Yarn and NPM.
We also used a local server to load our HTML documents via an http:// scheme—which made browsers load our apps without throwing any CORS error.
However, live servers are limited to local developments and testing purposes.
In other words, you cannot use a live server in production to serve your HTML document via an http:// scheme. Instead, it would be best if you used a module bundler.
But what exactly is a module bundler, I hear you ask? Let's find out in the module bundler article.
Your support matters: Buy me a coffee to support CodeSweetly's mission of simplifying coding concepts.
Tweet this article