Complete Git Tutorial – All You Need to Get Started
Git is a Distributed Version Control System (DVCS) used to save different versions of a file (or set of files), wherein any version is retrievable at will.
Git makes it easy to record and compare different file versions. Consequently, details about what changed, who changed what, or who initiated an issue are reviewable anytime.
What Is a Version Control System?
Section titled “What Is a Version Control System?”A Version Control System (VCS) refers to the technique people use to save a file’s versions for future reference.
Intuitively, many people already version control their projects by renaming different versions of the same file in various ways like blogScript.js, blogScript_v2.js, blogScript_v3.js, blogScript_final.js, blogScript_definite_final.js, and so on. However, this approach is error-prone and ineffective for team projects.
Moreover, tracking what changed, who changed it, and why it got changed is a tedious endeavor. Thus, the importance of a reliable and collaborative version control system like Git.
What Git Is Not
Section titled “What Git Is Not”Git is not a Local Version Control System (LVCS) that saves file changes in a unique format on a local hard disk without collaborative support.
It is also not a Central Version Control System (CVCS) that centrally stores all its versioned files on a single server.
What Git Is
Section titled “What Git Is”Git is a Distributed Version Control System (DVCS) that allows clients to clone an entire project’s repository onto their disk.
In other words, Git enables storing and manipulating a file’s versions on multiple servers (computers).
So, if a server dies, the project’s repository is still retrievable from another server with a copy.
Additionally, many DVCS—including Git—have remote repositories (an online folder) that foster collaborative work on projects with anyone, anywhere, anytime.
But what exactly is the difference between remote repos and local repositories? Let’s find out.
Remote vs. Local Repositories: What’s the Difference?
Section titled “Remote vs. Local Repositories: What’s the Difference?”Remote repositories are like any local directory—they are just folders.
The main difference between the two repositories is that only the person with the system can access a local repository.
However, a remote repository—located on an open platform like the internet—is accessible by anyone, anywhere, anytime.
As such, remote repositories facilitate dynamic collaboration on projects.
Let’s now discuss the three states of a Git file.
What Are the Three States of a File in Git?
Section titled “What Are the Three States of a File in Git?”The three primary states (conditions) of a file in the Git version control system are:
- Modified
- Staged
- Committed
What is a modified file state in Git?
Section titled “What is a modified file state in Git?”A file in the modified state is a revised—but uncommitted (unrecorded)—file.
In other words, files in the modified state are files you have modified but have not explicitly instructed Git to monitor.
What is a staged file state in Git?
Section titled “What is a staged file state in Git?”A staged file is a modified file you have selected in its current state (version) in preparation for being saved (committed) into the .git repository during the next commit snapshot.
Once you stage a file, it implies that you have explicitly authorized Git to monitor that file’s version.
What is a committed file state in Git?
Section titled “What is a committed file state in Git?”Files in the committed state are files successfully stored in the .git repository.
In other words, a committed file is one in which you have recorded its staged version into the .git directory (folder).
Where Does Git Store Your Files?
Section titled “Where Does Git Store Your Files?”The three key places versions of a file may reside while version controlling with Git are:
- The working directory
- The staging area
- The
.gitdirectory.
What is a working directory?
Section titled “What is a working directory?”The working directory is a local folder for a project’s files.
In other words, any folder you create anywhere on a system is a working directory.
What is the staging area?
Section titled “What is the staging area?”The staging area is a file Git uses to store details about files it is about to commit into the .git directory.
What is a Git directory?
Section titled “What is a Git directory?”The .git directory is the folder Git creates inside the working directory you have instructed it to track.
The .git folder is where Git stores the object databases and metadata of the file(s) you have instructed it to monitor.
Let’s now see what a basic Git workflow looks like.
The Basic Git Workflow
Section titled “The Basic Git Workflow”Working with the Git Version Control System looks something like this:
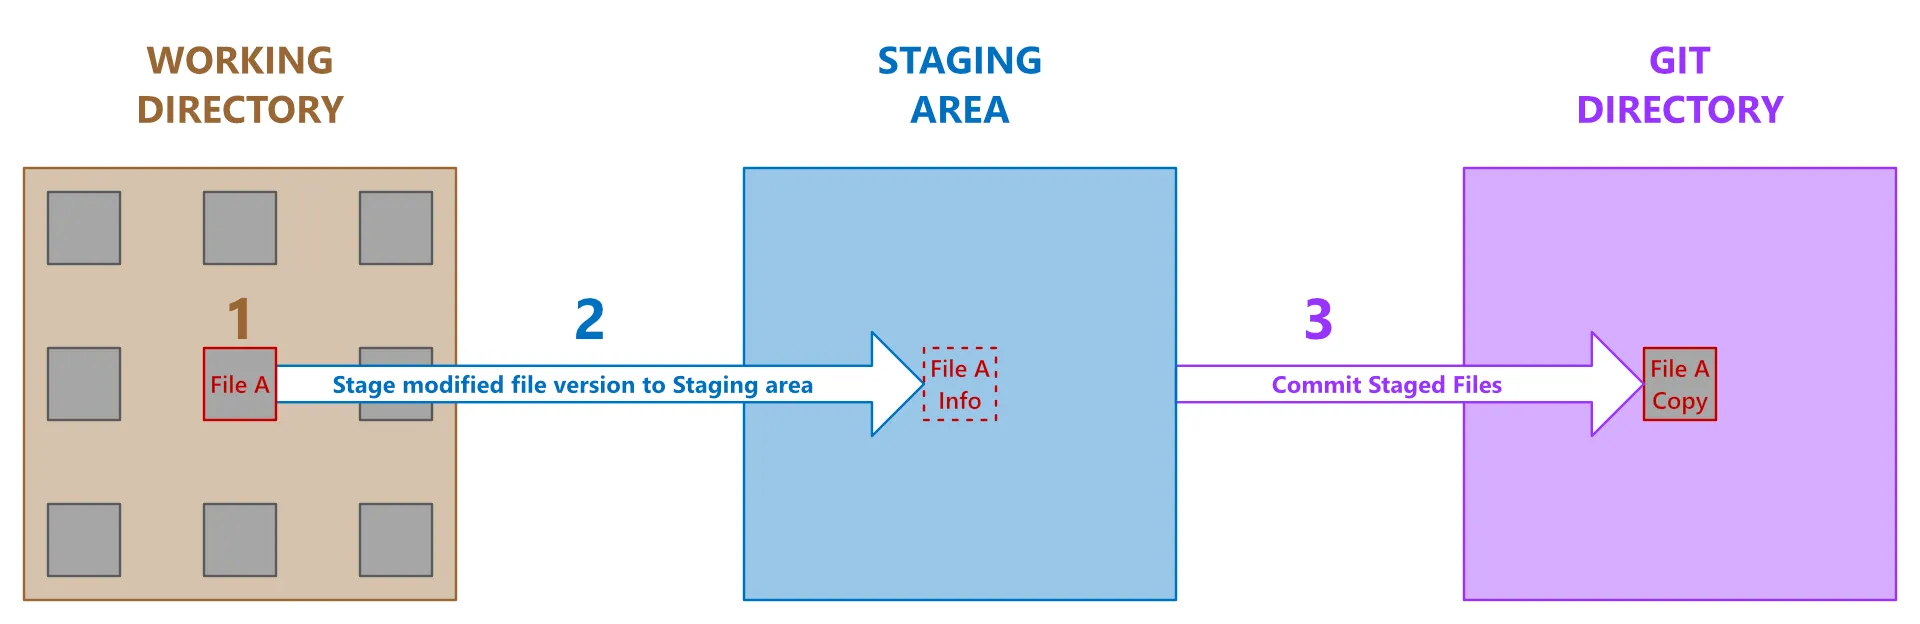
The basic workflow of files while version controlling with Git
-
Modify files in the working directory.
-
Selectively stage the files you want to commit to the
.gitdirectory. -
Commit the files you have staged into the
.gitdirectory. In other words, permanently store a snapshot of the staged files in the.gitdatabase.
So, now that we know Git’s basic workflow, we can discuss how to use it.
How to Use Git
Section titled “How to Use Git”Before you can use Git, you need to install it on your system—so let’s start with the installation process.
Installing Git
Section titled “Installing Git”You can easily install Git from the Git download webpage.
A handy way to check the version installed on your system is to run the following:
git --versionAfter the installation, it is necessary to keep it up to date whenever there is a new version.
Updating Git
Section titled “Updating Git”If you are using a Windows system and your currently installed Git version is 2.16.1 or higher, freely get the latest Git version with this command:
git update-git-for-windowsOnce you have the correct version installed on your system, you can proceed with the setup process by initializing Git in your project directory.
Initializing Git
Section titled “Initializing Git”Initialization is to make Git ready to start monitoring files in a specified directory.
To initialize Git in a directory currently not under version control, you must first go inside that directory from your terminal.
cd path/to/the/directoryAfterward, initialize Git in that project’s directory by running the following:
git initAfter running the command above, the computer will create a Git repository named .git in the project’s folder.
After the installation and initialization process, the next step is to configure Git. So, let’s do that now.
Configuring Your Project’s Git Username and Email
Section titled “Configuring Your Project’s Git Username and Email”Here’s the command to configure your username:
git config --global user.name "Your Name"And here is the command to setup your email:
Suppose you want to change a specific project’s configured name or email address. How can you do this? Let’s find out.
Changing a Project’s Git Username
Section titled “Changing a Project’s Git Username”You can change a project’s username configuration by using the terminal to navigate into that project’s directory and run the following command:
git config user.name "The New Name"Changing a Project’s Git Email
Section titled “Changing a Project’s Git Email”You can change a project’s email configuration by using the terminal to navigate into that project’s directory and run the following command:
Let’s now see how to confirm your Git configurations.
Checking Your Project’s Git Configurations
Section titled “Checking Your Project’s Git Configurations”You can view all your project’s Git configurations by running the following:
git config --listSuppose you wish to confirm the value stored for a single configuration (for instance, your email). In such a case, use the git config <key> command like so:
git config user.emailSo, now that you know how to configure your username and email, we can discuss using Git to track your files.
Tracking Your Files with Git
Section titled “Tracking Your Files with Git”To begin tracking files in an initialized folder, go into that project directory from the terminal and run:
git add <fileOrFolderName>After running the command above, Git will add the specified file (or folder) to the staging area.
Once Git adds a file (or folder) to its staging area, it means Git has started monitoring that file’s version for further modifications that may occur on it.
Git provides some options you can use with the git add command to help speed up the staging process—especially when you have multiple files to stage. Let’s discuss these options now.
What Are the Git Options for Staging Files Quickly?
Section titled “What Are the Git Options for Staging Files Quickly?”The options developers commonly use to quicken the process of adding multiple files to the staging area are:
-Aflag-uflag- The
.(dot) option - The
*(asterisk) option
What does the -A flag mean when staging files in Git?
Section titled “What does the -A flag mean when staging files in Git?”The -A flag is for staging all modified and untracked files in a project’s entire working directory—regardless of the current project directory in which you are.
git add -AWhat does the -u flag mean when staging files in Git?
Section titled “What does the -u flag mean when staging files in Git?”The -u flag is for staging only the modified files you previously committed.
git add -uWhat does the . (dot) option mean when staging files in Git?
Section titled “What does the . (dot) option mean when staging files in Git?”The . (dot) option is for staging all modified and untracked files located only in the current project’s directory in which you are.
git add .What does the * (asterisk) option mean when staging files in Git?
Section titled “What does the * (asterisk) option mean when staging files in Git?”Although you can use the git add * command to stage multiple files. However, to prevent unexpected results, it is best to avoid using it.
Important Stuff to Know about Staging Files in Git
Section titled “Important Stuff to Know about Staging Files in Git”Here are two essential facts to remember whenever you stage files in Git.
1. Staging does not save your files
Section titled “1. Staging does not save your files”Whenever you stage your files, it does not imply saving them in the Git directory.
Staging implies that you have added details about your staged files into an “index” file in the Git directory.
2. Git commits only the files you’ve staged
Section titled “2. Git commits only the files you’ve staged”Only the file versions in the staging area get committed to subsequent historic snapshots—not the working directory’s versions.
In other words, whenever you run the commit command, Git will only save the file versions presently in the staging area—not the ones in your working directory.
Let’s now discuss how to commit files to Git.
Committing Files to Git
Section titled “Committing Files to Git”Committing files to Git means storing the staged version of your working directory’s files in the .git repository.
To commit a file that is currently in the staging area, run the following:
git commit -m "Write a message about the file(s) you are committing"The -m flag allows you to write your message in-line with the commit command. If you omit it, Git will launch your text editor with comments prompting you to enter your commit message.
You can delete the editor’s comments and type in your commit message. Or you can leave the comments and add your commit message.
Once you’ve finished writing your commit message inside the text editor, exit it so that Git can create the commit.
Writing commit messages with a text editor allows you to write long notes—even with multiple paragraphs. However, for short commit messages, the in-line method is sufficient.
Let’s now discuss the three main parts of a Git commit message.
What Are the Three Main Parts of a Git Commit Message?
Section titled “What Are the Three Main Parts of a Git Commit Message?”The Git commit message developers write in their text editor typically follow the same basic structure:
- Summary: Short description of the commit
- Body: Additional contextual description of the commit
- Footer: Metadata details about the commit, such as external links and issue reference
Syntax of a Git commit message
Section titled “Syntax of a Git commit message”<summary><BLANK LINE><body><BLANK LINE><footer>Example of a Git commit message
Section titled “Example of a Git commit message”Use 50 characters or less to summarize the changes
Provide extra information about the changes you are committing. And youshould wrap this addon text at around 72 characters because Git does notwrap text automatically. Although, some text editors, like VSCode, helpwith text wrapping.
Remember that it is essential to use a blank line to separate each sectionof your commit message (the summary, body, and footer).
It is okay to have multiple paragraphs in the body section. You can alsouse bullet points. However, note the following:
- Precede each bullet point with a space
- Separate each bullet point with a blank line
- People typically use a hyphen or asterisk to indicate bullet points
The footer is the last part of a long commit message. Use it for issuereferences, external links, and other metadata details like so:
Resolves: #35Note the following:
- We typically write the footer in a
<word-token>: <string>format. - The
<word-token>typically uses hyphens (-) instead of whitespace characters to separate words—except while indicatingBREAKING CHANGE. This convention helps to differentiate the footer section from the body of a commit message. - You can use whitespace and newline characters in your footer’s
<string>. - You can use the
BREAKING CHANGEtext as your footer’s<word-token>.
Important stuff to know about Git commit messages
Section titled “Important stuff to know about Git commit messages”Here are six essential facts to remember when writing your commit messages.
1. Standardize your commit message by specifying its type
Section titled “1. Standardize your commit message by specifying its type”The Conventional Commits specification recommends prefixing the summary section of your commit message with a type.
Here’s the syntax:
<type>: <summary>Here’s an example:
fix: Use 50 characters or less to summarize the changes2. There are 11 <type>s developers often use
Section titled “2. There are 11 <type>s developers often use”The eleven <type>s developers typically use to categorize their commits are:
- build: for commits that impact your app’s build step or external dependencies—for instance, an update to your NPM package.
- chore: for commits that implemented maintenance-related updates, such as updating your
.gitignorefile, or an existing API key. - ci: for commits that modify your CI (continuous integration) configurations.
- docs: for commits that modify your project’s documentation.
- feat: for commits that add a new feature to your codebase. This commit type is synonymous with a MINOR release in Semantic Versioning (SemVer).
- fix: for commits that add bug fixes to your codebase. This commit type is synonymous with a PATCH release in Semantic Versioning (SemVer).
- perf: for commits that improve your app’s performance.
- refactor: for commits that refactor specific parts of your codebase—for instance, renaming a function.
- revert: for commits that revert your codebase to a previous commit history. You may also add the commit SHAs you are reverting to the footer as references—for instance,
Refs: 7b804hrw, b394c306. - style: for commits that modify your code’s style, such as adding semi-colon, white-space, or indentation.
- test: for commits that modify your app’s test code.
3. How to indicate breaking changes in a commit message
Section titled “3. How to indicate breaking changes in a commit message”Suppose a specific commit includes breaking changes. In that case, you can indicate it through one (or both) of the following ways:
- Append the commit type with an exclamation mark—for instance,
fix! - Add a
BREAKING CHANGE:text to the beginning of your commit message’s body or footer section.
Here’s an example:
feat!: Use 50 characters or less to summarize the changes
BREAKING CHANGE: Provide extra information about the changes you arecommitting. And you should wrap this addon text at around 72 charactersbecause Git does not wrap text automatically. Although some texteditors, like VSCode, help with text wrapping.
Resolves: #71Refs: codesweetly.com/how-to-use-git, codesweetly.com/git-cheat-sheet4. How to write long commit messages in the terminal
Section titled “4. How to write long commit messages in the terminal”Below is the command line syntax for writing your commit message’s summary, body, and footer.
git commit -m "Write your summary" -m "Write your body" -m "Write your footer"5. How to view the changes you are about to commit
Section titled “5. How to view the changes you are about to commit”Suppose you use the text editor to input your commit message. In that case, add the -v flag to the git commit command like so:
git commit -vBy doing so, Git will include the diff of your changes in the editor so you can see the exact changes you are about to commit.
In other words, use the -v flag to include—at the bottom of the text editor’s commit message template—the differences between what you are currently committing and your previous commit.
6. It pays to draft a good commit message
Section titled “6. It pays to draft a good commit message”Crafting a good commit message will help your collaborators (and yourself—after some time) understand why you committed a specific version of your project’s files.
It will also help clarify differences between the file versions committed.
Suppose you wish to commit your changes without staging them first. In such a case, you can skip the staging area. Let’s find out how.
Committing Files without Staging Them
Section titled “Committing Files without Staging Them”You can skip the staging area while committing your files (that is, omit running the git add command) by adding an -a flag to your git commit command like so:
git commit -aBy so doing, Git will automatically stage all the files it is already tracking. After the automatic staging, it will then commit the files.
Suppose you do not want Git to monitor nor commit specific files or folders. How can you do this? Let’s find out.
Making Git Ignore Specific Items
Section titled “Making Git Ignore Specific Items”We use a .gitignore file to tell Git the files or folders it should ignore—including not listing them as untracked.
Creating a .gitignore file
Section titled “Creating a .gitignore file”To create a .gitignore file, go into the root directory where the files you want to ignore are. Then, run the command below in your terminal:
touch .gitignoreLet’s now see how to specify the items you want Git to ignore.
Specifying the items you want Git to ignore
Section titled “Specifying the items you want Git to ignore”Open your project’s .gitignore file and write the filenames, folders, or file types you want Git to ignore.
Here is an example:
# In a ".gitignore" file, an asterisk (*) is a wildcard symbol that# means zero or more characters—but not a slash (/)—can replace# the asterisk.
# The command below will ignore any document starting with "abc"# located anywhere in this project:abc*
# The command below will ignore all ".txt" filetypes located anywhere# in this project:*.txt
# In a ".gitignore" file, an exclamation mark (!) means "important."
# The command below will track "readme.txt" filetypes, even though# you've instructed Git—through the asterisk command above—to# ignore all ".txt" files:!readme.txt
# The command below will ignore any "package-lock.json" file located# anywhere in this project:package-lock.json
# The command below will ignore only the "passwords.text" file# located in the specified directory:directory/of/passwords.text
# This command below will only ignore the "NOTE" file in the current# directory—not in any other folder—of this project:/NOTE
# The following command will ignore all the content inside any folder# named "modules":modules/
# This command below will ignore all ".txt" files directly inside the# folder named "mix":mix/*.txt
# Note that the command above will still track all ".txt" files that# are in the subdirectories of the "mix" folder. For instance, it# will ignore "mix/test.txt" but will track "mix/real/test.txt".
# In a ".gitignore" file, double asterisks (**) mark—followed by a# slash (e.g., **/)—is a wildcard symbol that means zero or more# directories' names can replace the double asterisks.
# The command below will ignore all ".pdf" files inside both the# folder named "doc" and in any of its subdirectories:doc/**/*.pdf
# The question mark (?) in the command below means any single# character—except a slash—can replace the question mark:sea?.txt
# As such, the command above will ignore files like "seas.txt" or# "seat.txt". However, it will not ignore files like "seats.txt".
# In a ".gitignore" file, a pair of square brackets "[...]" specifies# the range of characters acceptable for a single character position.# Below are some examples.
# The command below means the character after character "n" can# either be character "s" or character "t":plan[st].js
# Therefore, the command above will match files like "plans.js" or# "plant.js". But it will not match "plane.js" nor "plants".
# The command below means the character after character "n" can be# any character between numbers "3 to 9" inclusive:plan[3-9].js
# Therefore, the command above will match files like "plan3.js" or# "plan5.js". But it will not match "plan10.txt" nor "plan1".
# The following command means the character after character "n" can# be any character between letters "f to z" inclusive:plan[f-z].js
# As such, the command above will match files like "plank.js" or# "plany.js". But it will not match "plan2.txt" nor "plane".
# An exclamation mark within a square bracket "[!]" means "negate".
# The command below means the character after character "n" cannot be# character "s" nor character "t":plan[!st].js
# Therefore, the command above will match files like "plane.js" or# "plan2.js". But it will not match "plans.js" nor "plant".Viewing a project’s commit history is a common practice while developing an app. So, let’s discuss how developers do this.
Viewing a Project’s Commit History
Section titled “Viewing a Project’s Commit History”You can view your project’s commit history by running the following:
git logAfter running the command above, if you get stuck on the Git console, just hit your keyboard’s Q key to exit.
Below are some options you can use with the git log command.
| Flag | Description | Example |
|---|---|---|
-3 | Limit the number of commit histories displayed to the last three entries. | git log -3 |
-p (Short for --patch) | Display the diff (differences) introduced in each commit. Note: The | git log -p |
--color-words | Make the | git log -p --color-words |
--abbrev-commit | Display an abbreviated version of the commit hash instead of all 40 characters. | git log --abbrev-commit |
--pretty | Display the default version of the commit history. | git log --pretty |
--pretty=short | Display the shorter version of the commit history. | git log --pretty=short |
--pretty=full | Display the full version of the commit history. | git log --pretty=full |
--pretty=fuller | Display the fuller version of the commit history. | git log --pretty=fuller |
--pretty=oneline | Display the one-line version of the commit history. | git log --pretty=oneline |
--pretty=oneline --abbrev-commit | Display the one-line version of the commit history while also abbreviating the commit hash. | git log --pretty=oneline --abbrev-commit |
--oneline | A shorthand version of --pretty=oneline --abbrev-commit | git log --oneline |
--name-only | Display the names of the modified files. Note: The | git log --name-only |
--name-status | Display the names of modified files and their modification status (added, modified, or deleted). | git log --name-status |
--relative-date | Display the relative date format instead of the full date—for instance, 2 days ago. | git log --relative-date |
--stat | Display the statistic of the changes that occurred in each commit. | git log --stat |
--shortstat | Display a brief statistic of the changes that occurred in each commit. | git log --shortstat |
--graph | Display the “branch and merge” history’s ASCII graph alongside the commit history. | git log --graph |
Let’s now see how to compare a project’s commit history.
Comparing the Commit History of Two Git Branches
Section titled “Comparing the Commit History of Two Git Branches”You can compare the commit history of one Git branch with another like so:
git log first-branch-name..second-branch-nameThe code above tells Git to compare the commit history of first-branch-name with second-branch-name.
Therefore, Git will log out the commits present in second-branch-name but not in first-branch-name.
Other Git Commands You Will Find Useful
Section titled “Other Git Commands You Will Find Useful”Below are other handy Git commands.
Checking the status of your files
Section titled “Checking the status of your files”git statusChecking where Git got installed on your system
Section titled “Checking where Git got installed on your system”which gitComparing the file version in the staging area with the most recent version committed into the Git directory
Section titled “Comparing the file version in the staging area with the most recent version committed into the Git directory”git diff --stagedThe command above will show the difference between the file versions in the staging area and those most recently committed to the Git directory.
Comparing the version of files in the working directory with those you added to the staging area
Section titled “Comparing the version of files in the working directory with those you added to the staging area”git diffConfirming if a specific item is in the .git directory
Section titled “Confirming if a specific item is in the .git directory”git ls-files | grep <fileOrFolderName>Opening gitignore’s manual page
Section titled “Opening gitignore’s manual page”git help gitignoreRemoving files from Git version control and the working directory
Section titled “Removing files from Git version control and the working directory”Use the following code to delete a file from your system and to stop Git from tracking the file.
git rm fileToDeleteRemoving files from Git version control only
Section titled “Removing files from Git version control only”Use the following code to stop Git from tracking a staged file.
git rm --cached fileToDeleteRenaming a file
Section titled “Renaming a file”Here’s how to rename a file:
git mv currentFileName newFileNameHow to skip writing a commit message
Section titled “How to skip writing a commit message”Suppose you made only minor modifications to your file and prefer not to write a commit message. In such a case, you can skip writing the commit text by adding the --no-edit option to your git commit command like so:
git commit --amend --no-editHow to stage and commit at once
Section titled “How to stage and commit at once”Here’s how you can stage and commit your file at once:
git add <fileOrFolderName> && git commit -m "A message about your commit"How to undo a commit
Section titled “How to undo a commit”Suppose you wish to undo a specific commit. In such a case, run:
git revert <commit-to-undo>The snippet above tells Git to create a new commit that reverts the changes introduced in <commit-to-undo>.
Undoing the pushing of a commit upstream
Section titled “Undoing the pushing of a commit upstream”You can undo a commit you’ve recently pushed to a remote repository by running:
git revert HEADgit push origin mainThe snippet above tells Git to do the following:
- Create a new commit that reverts the changes made in the HEAD commit. (Note: The HEAD commit means your recent commit.)
- Push the local branch (named
main) to the remote branch (origin).
Undoing the staging of a specific file in the staging area
Section titled “Undoing the staging of a specific file in the staging area”Here’s how to remove a specific file from your project’s staging area:
git reset HEAD fileToUnstageThe command above can be dangerous if you add a --hard flag.
However, using git reset without the --hard flag makes it a non-destructive tool that would not change any file in your working directory.
Alternatively, you can also use:
git restore --staged fileToUnstageUndoing the staging of all files in the staging area
Section titled “Undoing the staging of all files in the staging area”Here’s how to undo the staging of all the files in the staging area:
git resetViewing all the files currently in the staging area and the .git repository
Section titled “Viewing all the files currently in the staging area and the .git repository”git ls-filesWriting text into a file via the terminal
Section titled “Writing text into a file via the terminal”echo textToWrite >> fileToWriteIntoDangerous Git Commands
Section titled “Dangerous Git Commands”Commands that permit you to undo changes are generally dangerous because they can permanently delete your work—if you do it wrongly!
Therefore, be super careful with these commands!
How to amend your last commit
Section titled “How to amend your last commit”Suppose you forgot to include something in your last commit—for instance, a file. In that case, do the following:
- Use the
git add <fileName>command to stage the missing content. - Run the following code:
git commit --amendAfter you’ve invoked the snippet above, a COMMIT_EDITMSG file will open, prompting you to update your previous commit message.
You can choose to update the previous commit message or retain it.
Once you’ve decided on the message to use, exit the COMMIT_EDITMSG file so that Git can create the commit.
Afterward, Git will automatically replace your last commit with this updated version.
How to forcefully push to a remote repository
Section titled “How to forcefully push to a remote repository”You can forcefully overwrite a remote repository with your local .git repo by running the following:
git push --forceBy so doing, Git won’t ask you to update your local branch before pushing to the remote repo.
In other words, Git’s default setting compels you to update your local branch with the latest commits of the remote repository to which you wish to push.
However, the --force flag allows you to override Git’s default configuration.
Keep in mind that git push --force is a dangerous command because:
- It makes it easy to erase commits your collaborators recently pushed to the remote repo.
- The local repo you are moving upstream will replace any old commit on which your colleagues’ new work still relies.
How to rebase Git commits
Section titled “How to rebase Git commits”Git rebasing is a technique used to change the base of a specific commit from one branch to another.
In other words, Git rebase allows you to cut off one branch’s commit and reapply it to another.
The three main things people do with the git rebase command are:
- Modify a previous commit message
- Merge multiple commits
- Delete redundant commits
Let’s discuss some helpful ways to use the rebase command.
How to modify a previous commit message
Section titled “How to modify a previous commit message”Suppose you wish to amend a previous commit message. In that case, use the rebase command like so:
git rebase -i HEAD~2The snippet above tells Git to begin an interactive rebasing session from the two previous commits.
Once you’ve invoked the interactive rebasing command, a git-rebase-todo file will open in your text editor. The file will look like this:
pick 324c9db Create index.html filepick 1d0923a Create Addition component
# Rebase 5b8c120..1d0923a onto 5b8c120## Commands:# p, pick <commit> = use commit# r, reword <commit> = use commit, but edit the commit message# e, edit <commit> = use commit, but stop for amending# s, squash <commit> = use commit, but meld into previous commit# f, fixup [-C | -c] <commit> = like "squash" but keep only the previous# commit's log message, unless -C is used, in which case# keep only this commit's message; -c is same as -C but# opens the editor# x, exec <command> = run command (the rest of the line) using shell# b, break = stop here (continue rebase later with 'git rebase --continue')# d, drop <commit> = remove commit# l, label <label> = label current HEAD with a name# t, reset <label> = reset HEAD to a label# m, merge [-C <commit> | -c <commit>] <label> [# <oneline>]# . create a merge commit using the original merge commit's# . message (or the oneline, if no original merge commit was# . specified); use -c <commit> to reword the commit message## These lines can be re-ordered; they are executed from top to bottom.## If you remove a line here THAT COMMIT WILL BE LOST.## However, if you remove everything, the rebase will be aborted.The opened file allows you to specify the commits where the script should stop so that you can edit the previous commit message.
For instance, suppose you only need to modify 324c9db commit’s message. In that case, you would change 324c9db’s pick command to edit like so:
edit 324c9db Create index.html filepick 1d0923a Create Addition componentThen, you would save and close the git-rebase-todo file.
Afterward, Git will go back to the 324c9db commit and drop you a piece of information on the command line that looks like this:
$ git rebase -i HEAD~2Stopped at 324c9db...  Create index.html fileYou can amend the commit now, with
  git commit --amend
Once you are satisfied with your changes, run
  git rebase --continue
In other words, run git commit --amend to modify 324c9db commit’s message. Then use git rebase --continue to finish the rebase process.
How to squash commits
Section titled “How to squash commits”The interactive rebase tool lets you squash (merge) two or more commits together.
For instance, suppose you began an interactive rebasing session from your project’s root commit like so:
git rebase -i --rootLet’s now assume that after running the snippet above, a git-rebase-todo file opened with four commit histories similar to this:
pick 7e8525d Create project directorypick 5b8c120 Initialize NPMpick 324c9db Create index.html filepick 1d0923a Create Addition componentYou can merge the two most recent commits with the third one by changing the word pick to squash like so:
pick 7e8525d Create project directorypick 5b8c120 Initialize NPMsquash 324c9db Create index.html filesquash 1d0923a Create Addition componentOnce you save and close the git-rebase-todo file, a COMMIT_EDITMSG file will open, prompting you to merge your previous commit messages.
In other words, your COMMIT_EDITMSG file would look like this:
# The first commit's message is:Initialize NPM
# This is the 2nd commit message:Create index.html file
# This is the 3rd commit message:Create Addition component
You need to merge the three commit messages.
Here’s an example:
# This is a combination of 3 commits.Create package.json, index.html, and Addition.js filesAfterward, save and close the COMMIT_EDITMSG file so that Git can finish the squashing process.
Splitting a previous commit
Section titled “Splitting a previous commit”The interactive rebase tool allows you to split a previous commit into multiple commits.
For instance, suppose you began the interactive rebasing session from your project’s root commit like so:
git rebase -i --rootLet’s now assume that after running the snippet above, a git-rebase-todo file opened with three commit histories like this:
pick 5b8c120 Initialize NPMpick 324c9db Create index.html and style.css filespick 1d0923a Create Addition componentYou can split the middle commit (324c9db) into two different commits.
In other words, you can split Create index.html and style.css files into two commits: the first will use “Create index.html file” as its commit message, and the second will use “Create style.css file”.
Here are the steps required to split your previous commit:
1. Change pick to edit
Section titled “1. Change pick to edit”Change the pick command to edit for the commit you wish to split.
Here’s an example:
pick 5b8c120 Initialize NPMedit 324c9db Create index.html and style.css filespick 1d0923a Create Addition componentSave, and close the git-rebase-todo file once you’ve changed the command.
Afterward, Git will go back to the 324c9db commit and drop you a piece of information on the command line that looks like this:
$ git rebase -i --rootStopped at 324c9db... Create index.html and style.css filesYou can amend the commit now, with
  git commit --amend
Once you are satisfied with your changes, run
git rebase --continue2. Reset the commit
Section titled “2. Reset the commit”At this stage, reset the commit to the one before the HEAD pointer like so:
git reset HEAD^The snippet above will move the HEAD pointer to the commit before the one you wish to split.
In other words, the git reset command will update your project’s staging area with the content of the commit right before the one you want to split.
Therefore, you can now create and commit new files individually.
3. Stage and commit files
Section titled “3. Stage and commit files”Once you’ve reset your HEAD pointer, you can begin to stage and commit files.
For instance, you can split “Create index.html and style.css files” into two commits by staging and committing them like so:
git add index.htmlgit commit -m "Create index.html file"git add style.cssgit commit -m "Create style.css file"4. Finish the rebase process
Section titled “4. Finish the rebase process”When you’ve finished splitting your previous commit, end the rebase process by running the following:
git rebase --continueReplacing a working directory’s file with the last committed or staged version
Section titled “Replacing a working directory’s file with the last committed or staged version”git checkout -- localFileToDeleteAndReplaceAlternatively, you can also use:
git restore localFileToDeleteAndReplaceSharing a Git Repository
Section titled “Sharing a Git Repository”Sharing a Git repository online makes it easy for collaborators to collaborate on a project from anywhere, at any time.
Moreover, GitHub—a popular online platform used for sharing .git repositories—takes Git collaboration to a whole new height.
To share your Git repository (your project’s committed file versions) on GitHub, follow this How to Host a Git Repository on GitHub guide.
Cloning a Git Repository
Section titled “Cloning a Git Repository”Git Cloning is mainly about getting (downloading) a copy of a .git repository.
For instance, you may need a copy of a project you intend to modify. In such a case, getting a clone of the project’s .git directory puts in your possession all the file versions the project’s contributors have committed to the .git repository.
To clone a repository, run the following:
git clone <theGitRepoURL> <state the place to put the cloned git folder>By so doing, Git will download a copy of the specified .git repository into the place you’ve identified.