Module Bundler in JavaScript – How to Use Webpack
A module bundler is a tool developers use to bundle an app’s modules and dependencies into a single browser-compatible JavaScript file.
Why Do You Need a Module Bundler?
Section titled “Why Do You Need a Module Bundler?”Module bundlers allow browsers to access the file you specified in a require() or import statement.
In other words, suppose a browser runs a JavaScript file with a require("./node_module/test/sample/app.js") statement. In such a case, the browser will throw an error that says Uncaught ReferenceError: require is not defined.
The computer will throw such an error because browsers cannot access files specified in a JavaScript program.
However, you can use a module bundler to create a new JavaScript file containing code browsers can read.
How Does a Module Bundler Work?
Section titled “How Does a Module Bundler Work?”A module bundler does its bundling work as follows:
First, it creates an output script file
Section titled “First, it creates an output script file”The module bundler will first create an “output script file” in your project’s dist folder.
Next, the module bundler compiles your code
Section titled “Next, the module bundler compiles your code”Secondly, the bundler will check the build step’s entry point for any occurrence of some require() or import statements.
Suppose the module bundler finds a require() or import statement. In such a case, the bundler will compile (combine) the content of each dependency specified in the statements with the entry point’s content.
Let’s now discuss the last thing a module bundler does.
Finally, it saves the compiled code
Section titled “Finally, it saves the compiled code”A module bundler’s last step is to save the compiled code into step 1’s output script file.
As a result, step 1’s script file (the build step’s output) will contain the content of the entry point and its dependencies—but no require() or import statements.
So, now that we know how a module bundler works, let’s discuss how to use a popular one—Webpack.
How to Use Webpack
Section titled “How to Use Webpack”Follow the steps below to learn how to use Webpack to bundle your project’s JavaScript file and its dependencies into a single output script file.
Step 1: Create a project directory
Section titled “Step 1: Create a project directory”Create a project folder—where this project’s files would reside.
Step 2: Go to the project’s root folder
Section titled “Step 2: Go to the project’s root folder”Using the command line, navigate to the root directory of your project like so:
cd path/to/project/root-directoryStep 3: Create a package.json file
Section titled “Step 3: Create a package.json file”Create a package.json file in your project’s root directory like so:
npm init -yStep 4: Install the Webpack module bundler
Section titled “Step 4: Install the Webpack module bundler”Install webpack and webpack-cli locally into your project as development dependency libraries:
npm install webpack webpack-cli --save-devStep 5: Create your project’s directories
Section titled “Step 5: Create your project’s directories”Create a “source” code folder (./src) and a “distribution” code folder (./dist).
mkdir src distStep 6: Create your source code files
Section titled “Step 6: Create your source code files”Create the following files inside the newly created source code directory.
index.htmlindex.js
Step 7: Add the JavaScript file to your HTML document
Section titled “Step 7: Add the JavaScript file to your HTML document”Open your index.html file and replicate the code below:
<!DOCTYPE html><html>  <head>    <meta charset="UTF-8" />    <meta name="viewport" content="width=device-width, initial-scale=1.0" />    <title>ES Module - CodeSweetly</title>  </head>  <body id="body">    <h1>Module Bundler Tutorial</h1>    <button id="button">Click Me to Change Color!</button>
    <script src="./index.js"></script>  </body></html>
Here are the main things we did in the HTML snippet above:
- We created a
<h1>and<button>element. - We added step 6’s JavaScript file to our HTML document.
Step 8: Install some dependencies
Section titled “Step 8: Install some dependencies”Using your text editor, install your project’s dependencies locally.
For instance, here’s how you can install the randomColor package as a local dependency:
npm install randomcolor --saveStep 9: Import your dependencies
Section titled “Step 9: Import your dependencies”Import your dependencies into your JavaScript source code with the require() method or the import statement.
For instance, here’s how to use the import statement to bring in step 8’s randomColor dependency into your index.js script file:
import randomColor from "randomcolor";The require() method equivalence of the snippet above is like so:
const randomColor = require("randomcolor");Step 10: Use the dependencies
Section titled “Step 10: Use the dependencies”Use the dependencies you imported in step 9 to do as you desire.
For instance, here’s how you may use the randomColor dependency:
// Import the randomColor dependency:import randomColor from "randomcolor";
// Initialize the bodyElement variable with the app's <body> element:const bodyElement = document.getElementById("body");
// Initialize the buttonElement variable with the app's <button> element:const buttonElement = document.getElementById("button");
// Define a changeBodyColor function:function changeBodyColor() {  // Initialize the color variable with the randomColor dependency's value:  const color = randomColor();
  // Style the app's <body> element's background with the color variable's value:  bodyElement.style.backgroundColor = color;}
// Add a click event listener to the app's <button> element:buttonElement.addEventListener("click", changeBodyColor);
In the snippet above, we told the computer that whenever a user clicks the buttonElement, it should:
- Invoke the
changeBodyColorfunction. - Initialize the function’s
colorvariable withrandomColor’s invocation output. - Use the
colorvariable’s value to style thebodyElement’s background color.
Let’s bundle up our entry point (the index.js file) and the randomColor dependency into a single JavaScript file.
Step 11: Start the build step
Section titled “Step 11: Start the build step”Using your terminal, create your bundle by running webpack like so:
npx webpackAfter running the command above, webpack will do the following:
- It will use your
index.jsas its entry point. - It will create a bundle (the output file) in your project’s
distfolder containing the content of the entry point and its dependencies.
Our next step is to tell browsers to use the newly created bundle. Let’s do that below.
Step 12: Refer browsers to the newly created bundle
Section titled “Step 12: Refer browsers to the newly created bundle”So, now that you have created a browser-compatible bundle file, you need to tell browsers to use it instead of the index.js source code file.
Therefore, go to your HTML file and substitute the reference to your JavaScript source code with Webpack’s distribution bundle.
For instance, instead of using "./index.js" in the <script> tag of your HTML file, you would use "../dist/main.js" like so:
<!DOCTYPE html><html>  <head>    <meta charset="UTF-8" />    <meta name="viewport" content="width=device-width, initial-scale=1.0" />    <title>ES Module - CodeSweetly</title>  </head>  <body id="body">    <h1>Module Bundler Tutorial</h1>    <button id="button">Click Me to Change Color!</button>
    <script src="../dist/main.js"></script>  </body></html>
Let’s now see our app!
Step 13: Check your app in the browser
Section titled “Step 13: Check your app in the browser”Open your HTML file in the browser to confirm that the browser can successfully read your app and its dependencies.
Remember that you created your HTML file manually in step 6. However, Webpack can also auto-generate one for you. Let’s find out how.
How to Make Webpack Auto-Generate Your App’s HTML File
Section titled “How to Make Webpack Auto-Generate Your App’s HTML File”Suppose your app is now outputting multiple bundles, or you’ve started using hashes to create unique filenames. In that case, you may find it increasingly difficult to manage your HTML file manually.
Therefore, Webpack allows you to use the HtmlWebpackPlugin to auto-generate and manage your project’s index.html file.
Follow the steps below to learn how to use HtmlWebpackPlugin to auto-generate and manage your project’s HTML file.
Step 1: Install HtmlWebpackPlugin
Section titled “Step 1: Install HtmlWebpackPlugin”Install the HtmlWebpackPlugin like so:
npm install html-webpack-plugin --save-devStep 2: Create a configuration file
Section titled “Step 2: Create a configuration file”Create a Webpack configuration file in your project’s root folder like so:
touch webpack.config.jsStep 3: Add the plugin to Webpack’s configuration
Section titled “Step 3: Add the plugin to Webpack’s configuration”Open your webpack.config.js file and add the HtmlWebpackPlugin plugin to it like so:
const HtmlWebpackPlugin = require("html-webpack-plugin");
module.exports = { plugins: [new HtmlWebpackPlugin()],};Step 4: Run the build step
Section titled “Step 4: Run the build step”Once you’ve installed and added HtmlWebpackPlugin to your project, recompile your modules like so:
npx webpackAfter running the build step, HtmlWebpackPlugin will do the following:
- It will auto-generate a new
index.htmlfile. - The plugin will automatically insert the bundles that Webpack generated into the newly created HTML document.
- It will auto-save the new HTML file inside your project’s distribution folder.
In other words, after running a build, the new HtmlWebpackPlugin()’s invocation (in the configuration file) will auto-generate a dist/index.html file with the following content:
<!DOCTYPE html><html> <head> <meta charset="utf-8" /> <title>Webpack App</title> <meta name="viewport" content="width=device-width,initial-scale=1" /> <script defer src="main.js"></script> </head> <body></body></html>Notice that the HTML document generated by HtmlWebpackPlugin does not contain your source file’s <h1> and <button> elements.
In other words, suppose you open the dist/index.html file in the browser. In that case, the browser will open an empty HTML page.
The HtmlWebpackPlugin omitted the content of the source code’s <body> element because it did not create the new file from the original document. Instead, it automatically created a brand-new HTML page that includes only the bundles Webpack generated.
However, you can also tell HtmlWebpackPlugin to use your source file as a template. Let’s see how below.
How to Make HtmlWebpackPlugin Use Your Source File as a Template to Auto-Generate a New HTML Page
Section titled “How to Make HtmlWebpackPlugin Use Your Source File as a Template to Auto-Generate a New HTML Page”To make HtmlWebpackPlugin use your HTML source file as a template, do the following:
1. Update your HTML file
Section titled “1. Update your HTML file”Open your index.html source code file and delete the <script> tag you previously used to reference webpack’s distribution bundle.
So, your HTML source code should look like this:
<!DOCTYPE html><html> <head> <meta charset="UTF-8" /> <meta name="viewport" content="width=device-width, initial-scale=1.0" /> <title>ES Module - CodeSweetly</title> </head> <body id="body"> <h1>Module Bundler Tutorial</h1> <button id="button">Click Me to Change Color!</button> </body></html>We deleted the distribution bundle’s script because HtmlWebpackPlugin will automatically insert one while it auto-generates the new HTML file.
Now, let’s configure the plugin to use your source code as a template.
2. Update your configuration file
Section titled “2. Update your configuration file”Open your project’s webpack.config.js file and update HtmlWebpackPlugin’s settings like so:
const HtmlWebpackPlugin = require("html-webpack-plugin");
module.exports = {  plugins: [    new HtmlWebpackPlugin({      template: "./src/index.html",    }),  ],};
In the configuration snippet above, we did the following:
- We passed an object argument containing a
templateproperty to theHtmlWebpackPluginfunction. - We initialized the
templateproperty with the path to our HTML source code.
So, if you now run the npx webpack command, HtmlWebpackPlugin will use ./src/index.html as a template to generate the new dist/index.html file.
Therefore, the newly created HTML distribution file will look like so:
<!DOCTYPE html><html> <head> <meta charset="UTF-8" /> <meta name="viewport" content="width=device-width, initial-scale=1.0" /> <title>ES Module - CodeSweetly</title> <script defer="defer" src="main.js"></script> </head> <body id="body"> <h1>Module Bundler Tutorial</h1> <button id="button">Click Me to Change Color!</button> </body></html>Suppose an index.html file already exists in your output (dist) directory. In that case, the new one generated by HtmlWebpackPlugin will replace the existing HTML file.
3. Check your app in the browser
Section titled “3. Check your app in the browser”Open the newly generated dist/index.html file in the browser to confirm that the browser can successfully read your app and its dependencies.
Important Stuff to Know about Updating Your App
Section titled “Important Stuff to Know about Updating Your App”Whenever you make changes to your source code, ensure to do the following for your updates to reflect in the browser:
- Rerun the build step.
- Refresh your browser.
Repeating the manual process of running the build step and refreshing your browser can be burdensome. Luckily, Webpack provides a way to automate the two tasks. Let’s find out how.
How to Rerun Webpack Automatically
Section titled “How to Rerun Webpack Automatically”Suppose you wish to automate the process of rerunning the build step. In that case, you can add a watch property to your package.json’s scripts field.
For instance, do the following:
1. Add watch to the scripts fields
Section titled “1. Add watch to the scripts fields”Open your project’s package.json file and add a watch property to its scripts field like so:
{ "name": "your_package", "version": "1.0.0", "scripts": { "test": "echo \"Error: no test specified\" && exit 1", "watch": "webpack --progress --watch" }}The snippet above added a "watch" property—with the value "webpack --progress --watch"—to the "scripts" field of our package.json file.
2. Run the watch script
Section titled “2. Run the watch script”Using your terminal, invoke your package.json’s watch script like so:
npm run watchOnce you’ve invoked the watch script, NPM will execute "webpack --progress --watch".
What is "webpack --progress --watch"?
Section titled “What is "webpack --progress --watch"?”The "webpack --progress --watch" command instructs NPM to:
- Run Webpack.
- Pass the
--progressand--watchoptions to Webpack’s configuration.
The --progress option will make NPM show the percentage progress of Webpack’s compilation.
The --watch option activates Webpack’s watch mode.
In other words, --watch instructs Webpack to watch and automatically recompile your modules each time you save changes to files within your dependency graph.
As an example, go to your index.js file and add a console.log statement to the changeBodyColor() function like so:
import randomColor from "randomcolor";
const bodyElement = document.getElementById("body");const buttonElement = document.getElementById("button");
function changeBodyColor() {  const color = randomColor();  bodyElement.style.backgroundColor = color;  console.log(color);}
buttonElement.addEventListener("click", changeBodyColor);
Afterward, save your changes. Then refresh your browser.
After the refresh, do the following:
- Open your browser’s console.
- Click your app’s
"Click Me to Change Color!"button.
You can see that the --watch flag automatically recompiled your modules when you saved your source code’s changes.
Therefore, you no longer need to run the npx webpack command manually again. Instead, the --watch flag will watch and automatically recompile your modules whenever you save changes.
So, now that we know how to automate Webpack’s execution, let’s discuss how to reload the browser automatically.
Reloading the Browser Automatically
Section titled “Reloading the Browser Automatically”Suppose you wish to automate the process of reloading your browser. In that case, you can use Webpack’s dev server package.
The following steps will show you how to configure and use the package.
Step 1: Install Webpack’s web server
Section titled “Step 1: Install Webpack’s web server”Using your terminal, install the webpack-dev-server package like so:
npm install webpack-dev-server --save-devStep 2: Specify your files’ location
Section titled “Step 2: Specify your files’ location”Tell the web server where it should get the files that Webpack did not generate by adding a devServer option to the configuration file you created previously:
const HtmlWebpackPlugin = require("html-webpack-plugin");
module.exports = {  plugins: [    new HtmlWebpackPlugin({      template: "./src/index.html",    }),  ],  devServer: {    static: "./dist",  },};
The configuration snippet above tells the dev server to serve contents Webpack did not build from the project’s dist folder.
Note that the dev server serves files on localhost:8080 by default. However, you can specify the port you wish to use by adding a port property to the devServer option like so:
const HtmlWebpackPlugin = require("html-webpack-plugin");
module.exports = { plugins: [ new HtmlWebpackPlugin({ template: "./src/index.html", }), ], devServer: { static: "./dist", port: 5001, },};Let’s now see how to run the dev server.
Step 3: Run the dev server
Section titled “Step 3: Run the dev server”There are two ways to run the dev server.
- Use NPX on your CLI
- Use
package.json’s scripts field
Let’s discuss both ways below.
How to run Webpack’s dev server by using NPX on your CLI
Section titled “How to run Webpack’s dev server by using NPX on your CLI”Using the terminal, navigate to the root directory—where the webpack.config.js file is—then use NPX to run the dev server like this:
npx webpack serve --mode development --openThe snippet above used NPX to do the following:
- Run the build step by executing Webpack.
- Serve the build step’s output file from memory, not your hard disk.
Keep in mind that the dev server does not save the build step’s output file to any of your project’s directories. Instead, it does the following:
- It keeps the build step’s output files in memory (your system’s RAM).
- It serves the output files from memory, not your system’s hard drive.
Using your system’s memory to build and serve the output file makes the dev server fast at serving your bundle.
However, when your app is ready for production, remember to run the npx webpack compilation command to save your bundle in your project’s distribution folder—rather than in memory.
Let’s now discuss the second way to run the dev server.
How to run Webpack’s dev server by using package.json’s scripts field
Section titled “How to run Webpack’s dev server by using package.json’s scripts field”An alternate way to run the dev server is to add the "webpack serve --mode development --open" command to your package.json’s scripts field like so:
{ "name": "your_package", "version": "1.0.0", "scripts": { "test": "echo \"Error: no test specified\" && exit 1", "start": "webpack serve --mode development --open" }}Afterward, you can use npm run start on your terminal to execute the webpack serve --mode development --open command.
Once you’ve started the dev server—via either option 1 or 2, your default browser will automatically open with your project’s HTML page.
Then, anytime you save changes to your source code, the dev server will automatically reload your browser to reflect the recent updates.
Remember that we used a configuration file in step 2. Let’s talk more about what the file does.
What Exactly Is Webpack’s Configuration File?
Section titled “What Exactly Is Webpack’s Configuration File?”Webpack’s configuration file is a JavaScript file that allows you to modify or extend Webpack’s default settings.
For instance, Webpack’s default setting assumes your project’s entry point is src/index.js.
Also, by default, Webpack will minimize, optimize, and output the result of its build step into a dist/main.js file.
However, suppose you wish to change those default settings (or add more configurations). In such a case, you would need to create a configuration file—which Webpack will use automatically.
The following steps will show you how to create and use a Webpack configuration file.
Step 1: Go to the project’s root folder
Section titled “Step 1: Go to the project’s root folder”Navigate to your project’s root directory like so:
cd path/to/project/root-directoryStep 2: Create your project’s configuration file
Section titled “Step 2: Create your project’s configuration file”Create a configuration file in your project’s root folder like so:
touch webpack.config.jsStep 3: Specify your configurations
Section titled “Step 3: Specify your configurations”Open your project’s webpack.config.js file and specify the configuration options you wish to change (or add).
Here’s an example:
const HtmlWebpackPlugin = require("html-webpack-plugin");
module.exports = {  plugins: [new HtmlWebpackPlugin()],};
Here’s what we did in the configuration file above:
- We initialized the
HtmlWebpackPluginvariable with the"html-webpack-plugin"package. - We exported an object containing the
pluginsconfiguration we want Webpack to use.
So, whenever you run the build step, Webpack will automatically use the settings you’ve specified in the configuration file—rather than its default settings.
Let’s now run the build step.
Step 4: Run the module bundler
Section titled “Step 4: Run the module bundler”Using your terminal, create your bundle by running Webpack like so:
npx webpack --config webpack.config.jsThe --config webpack.config.js code used in the snippet above is optional. We used it above to illustrate that it is possible to pass a configuration of any name—which you may need for complex configurations that requires a split into multiple files.
However, Webpack will use the webpack.config.js file by default if it is present in your project’s root directory.
Keep in mind that plugins is only one of the numerous options you can use in a configuration file.
Let’s discuss other configuration options developers use.
Common Webpack Configuration Options
Section titled “Common Webpack Configuration Options”Below are popular configuration options you can use to alter (or extend) Webpack’s default settings.
The entry field specifies the file or files you want Webpack to use to begin the application’s bundling process.
Here’s an example:
module.exports = { entry: "./src/index.js",};The snippet above instructs Webpack to start its bundling process from "./src/index.js".
Suppose you used an array (or an object) as the entry field’s value. In that case, Webpack will process all the array’s (or object’s) items as the application’s entry points.
Here’s an example:
module.exports = { entry: ["./src/index.js", "./src/index-two.js", "./src/index-three.js"],};The code above instructs Webpack to start its bundling process from the three files specified in the entry array (that is, "./src/index.js", "./src/index-two.js", and "./src/index-three.js").
Here’s another example:
module.exports = { entry: { index: "./src/index.js", indexTwo: "./src/index-two.js", indexThree: "./src/index-three.js", },};The code above instructs Webpack to start its bundling process from the three files specified in the entry object (that is, "./src/index.js", "./src/index-two.js", and "./src/index-three.js").
context
Section titled “context”The context field points Webpack to the directory containing your entry files.
Here’s an example:
const path = require("path");
module.exports = {  entry: "index.js",  context: path.resolve(__dirname, "src"),};
The snippet above tells Webpack to locate the index.js entry file in the project’s src directory.
output
Section titled “output”The output field specifies how and where Webpack should output the bundles and assets it processed.
The three options commonly used with the output field are path, filename, and clean.
output.path
Section titled “output.path”The output.path option specifies the output directory you want Webpack to place the bundled file.
Here’s an example:
const path = require("path");
module.exports = {  entry: "./src/index.js",  output: {    path: path.resolve(__dirname, "dist"),  },};
The snippet above used the output.path option to tell Webpack to use the project’s "./dist" folder as the output directory.
output.filename
Section titled “output.filename”The output.filename option specifies how Webpack should name each bundle it creates.
Suppose you are creating only a single bundle via one entry point. In that case, you can specify a static name as the bundle’s filename.
Here’s an example:
const path = require("path");
module.exports = {  entry: "./src/index.js",  output: {    filename: "codesweetly.js",    path: path.resolve(__dirname, "dist"),  },};
The output.filename option tells Webpack to use "codesweetly.js" as the filename of the bundle created after processing "./src/index.js".
Suppose you wish to create multiple bundles through two or more entry points, code-splitting, or various plugins. In such a case, it is better to dynamically generate each bundle’s filename via any of Webpack’s substitutions techniques.
Let’s now discuss the three commonly used substitution techniques.
Substitutions technique 1: Entry name
Section titled “Substitutions technique 1: Entry name”The “entry name” substitutions naming technique makes Webpack create each bundle’s name by concatenating a bundle’s entry point’s name with a given string.
Here’s an example:
const path = require("path");
module.exports = {  entry: {    home: "./src/home-module.js",    promo: "./src/promo-module.js",    music: "./src/music-module.js",  },  output: {    filename: "[name].bundle.js",    path: path.resolve(__dirname, "dist"),  },};
The output.filename option tells Webpack to create each bundle’s filename by concatenating each entry point’s name with the ".bundle.js" string value.
So, for instance, suppose Webpack has finished processing the promo entry point (that is, "./src/promo-module.js"). In that case, the final bundle’s name will be "promo.bundle.js".
Let’s now discuss the second substitutions technique.
Substitutions technique 2: Internal chunk id
Section titled “Substitutions technique 2: Internal chunk id”The “internal chunk id” substitutions naming technique makes Webpack create each bundle’s name by concatenating a bundle’s entry point’s id with a given string.
Here’s an example:
const path = require("path");
module.exports = {  entry: {    home: "./src/home-module.js",    promo: "./src/promo-module.js",    music: "./src/music-module.js",  },  output: {    filename: "[id].bundle.js",    path: path.resolve(__dirname, "dist"),  },};
The output.filename option tells Webpack to create each bundle’s filename by concatenating each entry point’s internal chuck id with the ".bundle.js" string value.
Let’s now discuss the third substitutions technique.
Substitutions technique 3: Content hash
Section titled “Substitutions technique 3: Content hash”The “content hash” substitutions naming technique makes Webpack create each bundle’s name by concatenating the generated content’s hashes with a given string.
Here’s an example:
const path = require("path");
module.exports = {  entry: {    home: "./src/home-module.js",    promo: "./src/promo-module.js",    music: "./src/music-module.js",  },  output: {    filename: "[contenthash].bundle.js",    path: path.resolve(__dirname, "dist"),  },};
The output.filename option tells Webpack to create each bundle’s filename by concatenating each chunk’s content hash with the ".bundle.js" string value.
Keep in mind that Webpack allows you to combine different substitutions—for instance, filename: "[name].[contenthash].bundle.js".
You can also use a function to return a filename like so:
filename: (pathData) => { return pathData.chunk.name === "main" ? "[name].js" : "[name].bundle.js";};Webpack also permits you to initialize the filename property with a folder structure like so:
filename: "codesweetly/[name]/bundle.js",Now, let’s discuss the third property developers commonly use within the output field.
output.clean
Section titled “output.clean”As Webpack increasingly generates and saves files into your output directory, it is common to clutter a project’s /dist folder with unused files.
So, a good practice is to clean your output directory before each build step. By so doing, your /dist folder will contain used files only.
Let’s see how to do the cleanup below:
const path = require("path");
module.exports = {  entry: "./src/index.js",  output: {    filename: "codesweetly.js",    path: path.resolve(__dirname, "dist"),    clean: true,  },};
The clean option in the snippet above tells Webpack to clean the project’s output directory before each build step.
In other words, Webpack will empty the output directory before it begins each build step.
Therefore, the output directory will contain only the files generated from the compilation process—not any of the old files that Webpack previously saved there.
Let’s now discuss another popular configuration option that you can use to alter (or extend) Webpack’s default settings.
module
Section titled “module”The module field makes Webpack process assets—like CSS files and fonts—as modules in the dependency graph.
So, suppose you want Webpack to bundle non-JavaScript assets such as images, CSS files, fonts, and so on. In such a case, you can use the module option to specify how Webpack should manage those assets before adding them to the dependency graph.
Below are some common ways to use the module option.
How to use Webpack’s module option to load CSS stylesheets
Section titled “How to use Webpack’s module option to load CSS stylesheets”Here’s how you can use Webpack’s module option to load CSS stylesheets:
const path = require("path");
module.exports = {  entry: "./src/index.js",  output: {    filename: "main.js",    path: path.resolve(__dirname, "dist"),  },  module: {    rules: [      {        test: /\.css$/i,        use: ["style-loader", "css-loader"],      },    ],  },};
The configuration snippet above used the module property to tell Webpack to use "style-loader" and "css-loader" to load CSS files.
Keep in mind that the loaders’ order matters.
In other words, Webpack reads the loaders from right to left. Therefore, it will first execute the "css-loader" before the "style-loader".
So, "css-loader" will pass its result (that is, the processed resource) to the "style-loader". Then, "style-loader" will insert the final CSS resource into the <head> element of your HTML page.
It is necessary to install the loaders you want Webpack to use in loading your CSS assets.
So, for instance, before Webpack can use the previous configuration file to load ".css" assets, you need to install "style-loader" and the "css-loader".
Here’s how to install the two loaders:
npm install style-loader css-loader --save-devLet’s now see how to use the module option to load images.
How to use Webpack’s module option to load images
Section titled “How to use Webpack’s module option to load images”Here’s how you can use Webpack’s module option to load images:
const path = require("path");
module.exports = {  entry: "./src/index.js",  output: {    filename: "main.js",    path: path.resolve(__dirname, "dist"),  },  module: {    rules: [      {        test: /\.(png|svg|jpg|jpeg|gif)$/i,        type: "asset/resource",      },    ],  },};
The configuration snippet above used the module property to tell Webpack to load ".png", ".svg", ".jpg", ".jpeg", and ".gif" files as resource asset modules.
So, suppose the following import statement is in your script file:
import anyImage from "./your-image.png";In such a case, here’s how Webpack will load the image:
- Webpack will process
your-image.png. - It will add the processed image to your output directory.
- Webpack will initialize the
anyImagevariable with the processed image’s URL.
Let’s now see how to use the module option to load fonts.
How to use Webpack’s module option to load fonts
Section titled “How to use Webpack’s module option to load fonts”Here’s how you can use Webpack’s module option to load fonts:
const path = require("path");
module.exports = {  entry: "./src/index.js",  output: {    filename: "main.js",    path: path.resolve(__dirname, "dist"),  },  module: {    rules: [      {        test: /\.(woff|woff2|eot|ttf|otf)$/i,        type: "asset/resource",      },    ],  },};
The configuration snippet above used the module property to tell Webpack to load ".woff", ".woff2", ".eot", ".ttf", and ".otf" files as resource asset modules.
Once you’ve configured the loader, you can incorporate your fonts via the @font-face CSS declaration.
Here’s an example:
@font-face {  font-family: "Digital7";  src:    url("./digital-7.regular.woff") format("woff"),    url("./digital-7.regular.ttf") format("truetype");  font-weight: 600;  font-style: italic;}
div {  color: red;  font-family: "Digital7";}
Whenever css-loader loads the stylesheet above, it will process the specified fonts and add the processed copies to your project’s output directory.
Let’s now discuss another popular configuration option that you can use to alter (or extend) Webpack’s default settings.
devtool
Section titled “devtool”The devtool field tells Webpack to convert a compiled file to the source code format. Therefore, making it easier for you to debug the exact file (and line) where an error occurred in your source code.
Here’s an example:
const path = require("path");
module.exports = {  entry: "./src/index.js",  output: {    filename: "main.js",    path: path.resolve(__dirname, "dist"),  },  devtool: "source-map",};
At compilation time, if Webpack sees a devtool property in your configuration script, it will generate a .js.map file that the browser will use instead of the .js file.
Let’s now discuss another popular configuration option that you can use to alter (or extend) Webpack’s default settings.
The mode field tells Webpack the specific built-in optimization configuration you want it to use to build your output file.
You can specify whether Webpack should use production, development, or no (none) configuration to optimize your bundle. Let’s discuss each of the three optimization settings below.
Development mode
Section titled “Development mode”A mode: "development" setting tells Webpack to build an output file for use in the development environment.
Here’s an example:
const path = require("path");
module.exports = {  entry: "./src/index.js",  output: {    filename: "main.js",    path: path.resolve(__dirname, "dist"),  },  devtool: "source-map",  mode: "development",};
Setting a mode: "development" configuration will make Webpack create a bundle that:
- is fast to build
- is less optimized
- includes comments
- is not minified
- produces helpful error messages
- is easy to debug
Here’s an example of a mode: "development" bundle:
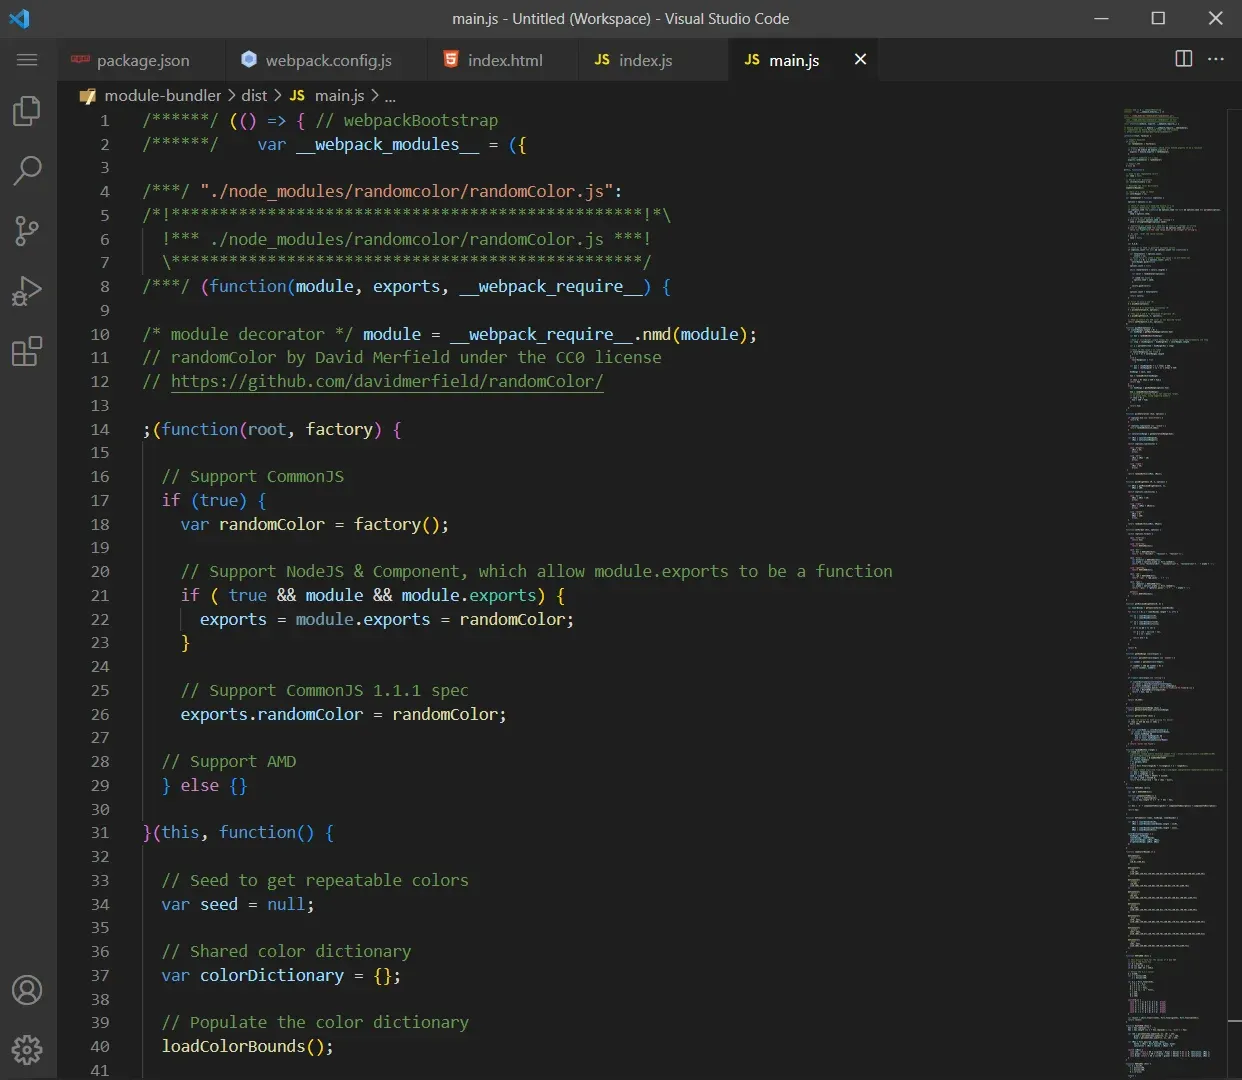
A screenshot of a development mode bundle compiled with webpack
To make a non-minified output file readable, ensure Webpack’s devtool field is not eval.
Whenever you set the mode to development, Webpack may default devtool’s value to eval. So, ensure to select a different devtool—like source-map or disable it by setting its value to "false"—whenever you wish to make your output file readable.
Suppose you choose to run Webpack in development mode. In that case, remember to change your configuration to production mode when you are ready to deploy your app.
Now, let’s discuss configuring Webpack to build your output file in production mode.
Production mode
Section titled “Production mode”A mode: "production" setting tells Webpack to build an output file for use in the production environment.
Here’s an example:
const path = require("path");
module.exports = {  entry: "./src/index.js",  output: {    filename: "main.js",    path: path.resolve(__dirname, "dist"),  },  devtool: "source-map",  mode: "production",};
Setting a mode: "production" configuration will make Webpack create a bundle that:
- is slow to build
- is more optimized
- excludes comments
- is minified
- does not produce detailed error messages
- is difficult to debug
Here’s an example of a mode: "production" bundle:
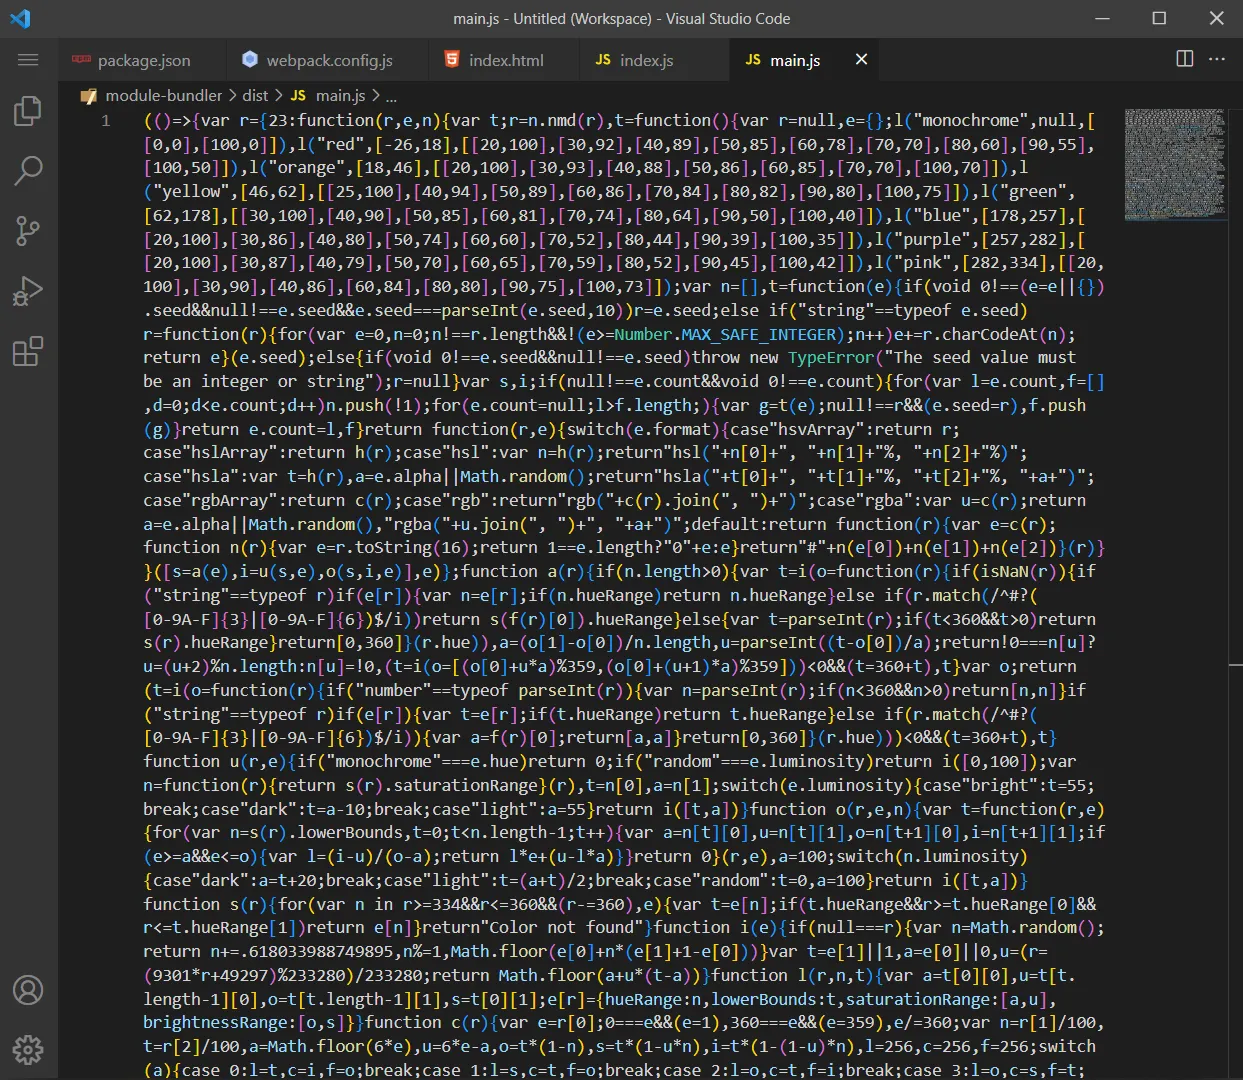
A screenshot of a production mode bundle compiled with webpack
Now, let’s discuss configuring Webpack to build your output file without any optimization settings.
None mode
Section titled “None mode”A mode: "none" setting tells Webpack to build an output file without optimizing it for development or production.
Here’s an example:
const path = require("path");
module.exports = {  entry: "./src/index.js",  output: {    filename: "main.js",    path: path.resolve(__dirname, "dist"),  },  mode: "none",};
Here’s an example of a mode: "none" bundle:
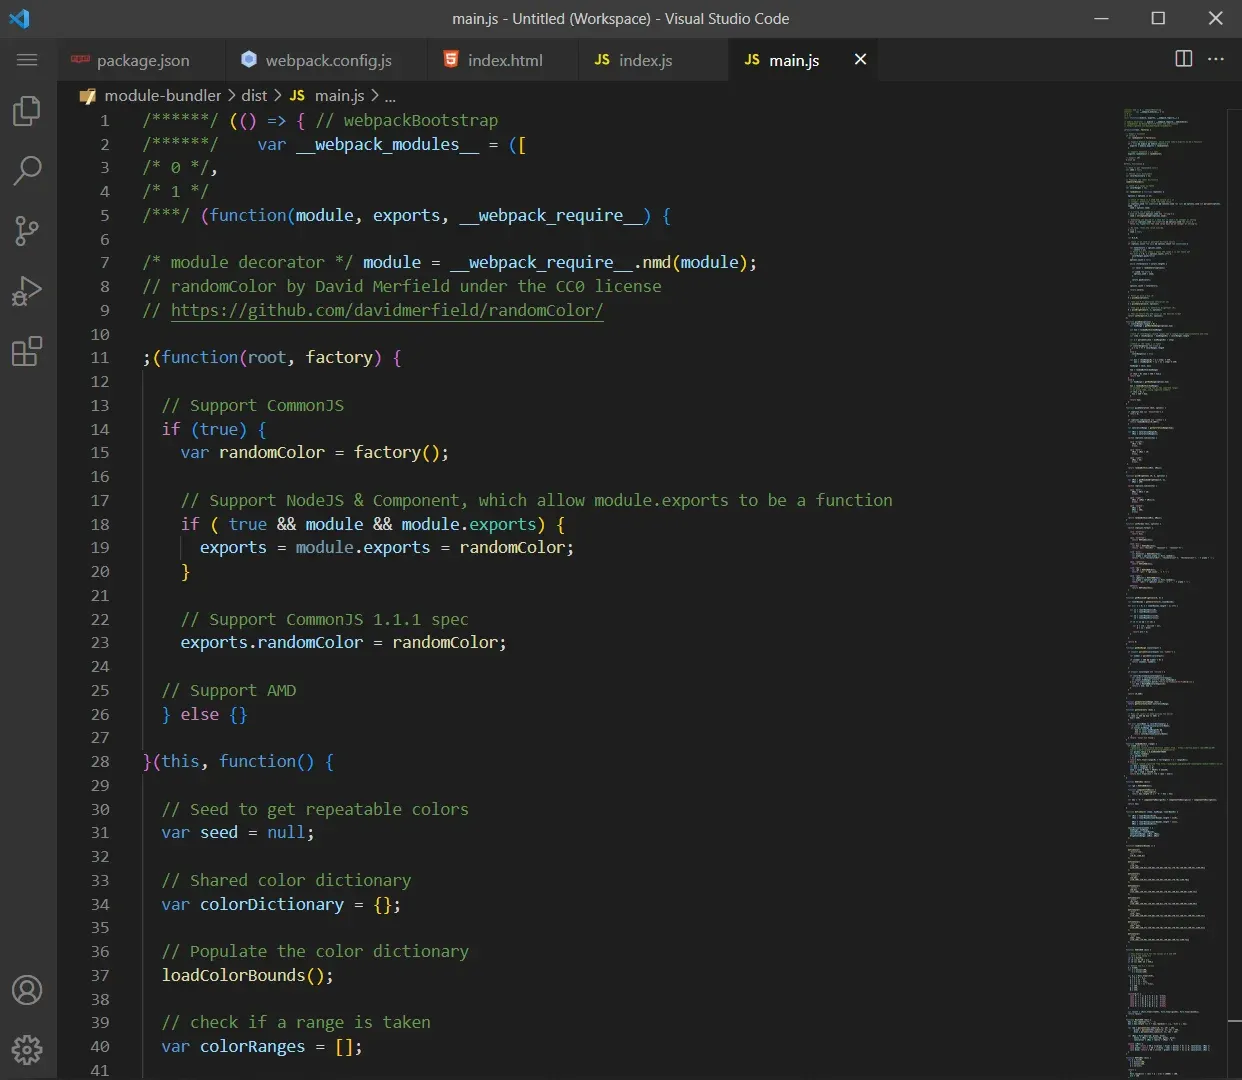
A screenshot of a none mode bundle compiled with webpack
Important stuff to know about the mode option
Section titled “Important stuff to know about the mode option”To make switching between development and production mode easy, you can store the mode configurations in the "scripts" field of your package.json file.
Here’s an example:
{ "name": "your-app-name", "version": "1.0.0", "scripts": { "test": "echo \"Error: no test specified\" && exit 1", "dev": "webpack --mode development", "build": "webpack --mode production" }}The snippet above initialized the scripts’ "dev" property with Webpack’s development mode command.
Likewise, we initialized the scripts’ "build" property with Webpack’s production mode command.
Therefore, suppose you execute npm run dev on your terminal. In that case, Webpack will execute the build step in development mode.